Creating a Route

About Creating a Route

A route defines the process and operations required to manufacture a product. It also specifies the order in which you must perform these operations.

A route is used in a work order or a process order in the Plant Applications database. This work order or process order is associated with a purchase order created in the ERP system, and is imported into Plant Applications using the ERP Integration services.

To create a route and make it available for use in a work order or a process order, you must perform the following steps:
  1. Add a route.
  2. Create operations in the route.
  3. Link each operation to one or more pieces of equipment and BOM items.
    Note: The equipment and BOM items exist in Plant Applications.
  4. Assign property groups and underlying properties to the route or individual operations in the route.
    Note: The property groups are created in the Property Definition module.
  5. Provide values to the underlying properties in each property group.
    Note: If a property contains a default value, you can retain it or modify it.
  6. Attach a document to the route or individual operations in the route.
    Note: The document must exist in Apache CouchDB. If it does not exist, upload it to Apache CouchDB before attaching it.
  7. Release the route.

When you access a draft route, the Edit Route page appears, as shown in the following image:

The Edit Route page contains the following sections:
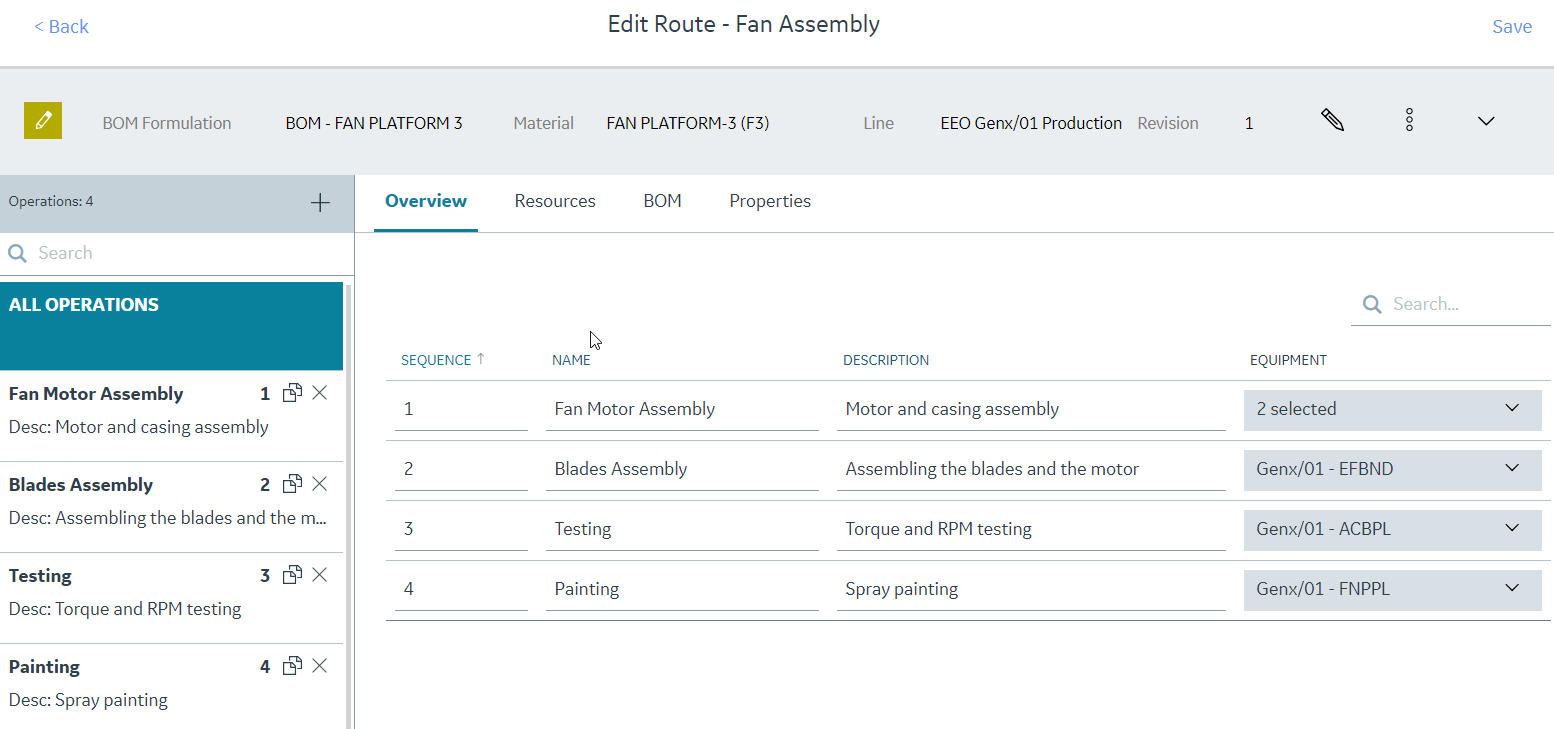
  • Faceplate: Contains details that you have provided while adding the route, such as name, description, product line, and other related information. This section also contains buttons to modify these details, and release, revise, archive, or delete the route. You can expand or collapse this section.
  • Operations: Contains a list of operations in the route. You can select an operation to access its details and link it to one or more pieces of equipment. You can create, copy, or delete an operation in this section.
  • Resources: Contains a list of equipment used for each operation. You can also access a list of operations assigned to each piece of equipment, and assign more operations.
  • BOM: Contains a list of BOM items assigned to each operation, along with details on the quantity of BOM items required for the operation, units of measurement, and whether consuming the BOM items is mandatory to perform the operation. You can also assign a BOM item to each operation.
  • Properties: Contains a list of property groups and underlying properties linked to the route or individual operations in the route, along with the default values, units of measurement, and data type, as specified in the Property Definition module. You can also assign a property group, and provide values for the underlying properties.
  • Documents: Contains a list of documents that are attached to the route or individual operations in the route. You can upload a document to Apache CouchDB, attach it to the route or an operation, upload a new version of a document, and remove the document from the route or operation.

Add a Route

About This Task

This topic describes how to create a route. You can also copy an existing one.

Before You Begin

The following components must exist in the Plant Applications database before you create a route:
  • A production line linked to a single virtual unit
  • Material defined for the production line
  • BOM formulation defined for the material

If these components do not exist, contact the Plant Applications administrator.

Procedure

  1. In the Route Management page, select .
    The Create Route window appears. The REVISION box is disabled and populated with the value 1 because this is the first draft of the route.
  2. Provide values as specified in the following table.
    FieldDescription
    NAMEEnter a unique name for the route that does not exceed 100 characters.
    DESCRIPTIONEnter a description for the route that does not exceed 1000 characters.
    PRODUCTION LINESelect a production line to which the route belongs. This box contains a list of production lines defined in Plant Applications Administrator. A value is required in this field.
    MATERIALSelect the material that you want to use in the route. This box is enabled after you select a value in the PRODUCTION LINE box. It contains a list of materials defined for the production line in Plant Applications.
    BOM FORMULATIONSelect the BOM formulation that you want to use in the route. This box is enabled after you select a value in the MATERIAL box. It contains a list of BOM formulations configured for the material in Plant Applications.
  3. Select Next.

Results

The route is created and is in the draft state. The Edit Route page appears, allowing you to create an operation.

Next Steps

Add an operation to the route.

Copy a Route

About This Task

A copied route is in the draft state by default, regardless of the state of the original route. When you copy a route, the operations, BOM items, properties, and documents in the route are also copied.

This topic describes how to copy a route. You can also create a new one.

Procedure

  1. In the Route Management page, perform one of the following tasks:
    • If you want to copy a route in the draft state, select the route that you want to copy.

      The Edit Route page appears.

    • If you want to copy a route in the released or archived state, select Released or Archived, respectively, and then select the route that you want to copy.

      The View Route page appears.

  2. Select , and then select Duplicate.
    The Copy Route window appears.
    • The NAME box contains a value in the following format: Copy of <name of the original route>
    • The REVISION box is disabled and populated with the value 1, regardless of the value in the REVISION box of the original route. This is because this is the first draft of the copied route.
    • The remaining boxes are populated with the corresponding values in the original route.
  3. Enter a unique name for the copied route. The name must not exceed 100 characters.
  4. As needed, modify values in the remaining boxes, and then select Copy.

Results

The route is copied. You can now add or remove operations, property groups, and documents to the copied route. You can also change the BOM items and equipment linked to the operations.

Create an Operation

About This Task

An operation is an activity that consists of steps that you perform while producing a product.

You can create operations in a route that is in the draft state. However, if you want to create an operation in a released or archived route, you must first revise the route.

When you create an operation, you can set the sequence of the operation, and select the equipment used for that operation.

This topic describes how to create an operation. You can also copy an existing one.

Before You Begin

Procedure

  1. In the Route Management page, select the route for which you want to create an operation.
    The Edit Route page appears, displaying a list of operations in the route.
  2. Select .
    A blank row appears in the Overview section.
  3. Provide values as specified in the following table.
    ColumnDescription
    SEQUENCEEnter the sequence number of the operation. By default, the value in this column is 1. If you want to perform multiple operations simultaneously (that is, for parallel tasks), provide the same sequence number.
    Tip: When setting the sequence numbers, provide a gap in their values so that you can easily add new operations between other operations. For example, if the sequence number of the first operation is 1, set the sequence number of the second operation to 10. This allows you to add new operations between these two operations without the need to modify the sequence numbers of all the operations.
    NAMEEnter a unique name for the operation that does not exceed 100 characters.
    Note: The name must be unique among all operations in the route.
    DESCRIPTIONEnter a description for the operation that does not exceed 1000 characters.
    EQUIPMENT

    Select the equipment that is used to perform the operation. You can select multiple pieces of equipment for the same operation, and you can select the same piece of equipment for multiple operations.

    When you select multiple pieces of equipment, the selected number appears. You can select the drop-down list box to view the selected pieces of equipment.

    Tip: You can also select the equipment used in an operation from the Resources section.

Results

The operation is created and added to the route.

Next Steps

Link a BOM item to the operation.

Link a BOM Item to an Operation

About This Task

A bill of material (BOM) contains BOM formulations that define a list of items and the quantity of each BOM item needed to produce a product. You can link a BOM item to a single operation. You can link multiple BOM items to an operation.

Before You Begin

  • Ensure that the route is linked to the BOM formulation that is associated with the BOM items that you want to link. To do so, in the Edit Route window of the route, select the appropriate value in the BOM Formulation box.
  • Create an operation in the route.

Procedure

  1. Access the route that is linked to the operation to which you want to link a BOM item.
    The Edit Route page appears, displaying a list of operations linked to the route.
  2. Select BOM.
    The BOM workspace appears, displaying a list of BOM items in the PRODUCT DESCRIPTION column. The SEQUENCE, PRODUCT CODE, QT PER, and UOM columns are populated with the sequence number of the BOM item, the product code, the quantity needed per operation, and the units of measure of the associated BOM formulation, respectively. You cannot modify these values.
  3. For each operation, select a value in each column as described in the following table.
    Note: You can link a BOM item to an operation only if ALL OPERATONS is selected in the Operations section.
    ColumnDescription
    OPERATIONContains a list of operations that you have added to the route. Select the operation that you want to link to the BOM item. You can select just one of the operations. If a BOM item is already assigned to an operation, the operation does not appear in the list.
    MANDATORYIdentifies whether the BOM item is required to perform the operation. By default, the value in this box is No.
  4. Select Save.

Results

Each BOM item is linked to the selected operations.

Next Steps

Attach a document to the route.

Upload a Document

About This Task

Using route management, you can add a document that contains reference material to perform an operation (for example, circuit diagram, standard operating procedure). To do so, you must first upload the document, and then attach it to the appropriate route.

When you upload a document, it is stored in a document store application named Apache CouchDB.

Before You Begin

Apache CouchDB must be installed, and the credentials must be provided while installing Plant Applications Universal Client. For more information, contact your administrator.

Procedure

  1. In the Route Management page, select the route for which you want to upload a document.
  2. Select Documents, and then select .
    The Upload document window appears.
  3. Provide values as specified in the following table.
    BoxDescription
    FILE NAME / URLIdentifies the URL or path to the document. The URL must use the HTTPS protocol.
    Tip: If the document is stored in the local machine or in a network location accessible from the local machine, you can select Browse to go to the path.
    NAMEIdentifies the name of the document. Enter a unique value that does not exceed 100 characters.
    Important: If a document with the same name exists, a new version of the same document is created, and is assigned the product line, material, and equipment of the original document. Therefore, you must ensure that the document name is unique among all the documents stored in the Plant Applications file store.
    ENGINEERING REVISION #Identifies the revision number of the document as specified in your organization. For example, if the document that you want to upload is a design document of revision number 15, enter 15.
    Note: The engineering revision number is different from the revision number maintained in the document store.
    DESCRIPTIONIdentifies the description of the document. You must enter a value.
    ASSOCIATION TYPE

    Identifies whether the document is associated with the product line, material, or piece of equipment that you select in the ASSOCIATION VALUE box.

    ASSOCIATION VALUE

    Identifies the product line, material, or piece of equipment with which the document is associated.

    This field contains a list of values of the type that you select in the ASSOCIATION TYPE box. For example, if you select Product Line in the ASSOCIATION TYPE box, the ASSOCIATION VALUE box contains a list of product lines in Plant Applications.

  4. Select Upload.

Results

The document is uploaded to the document store.

Next Steps

Attach the document to a route or an operation.

Attach a Document

About This Task

You can attach a document to an operation or a route so that an operator can refer to it when performing the operation.

Before You Begin

Procedure

  1. In the Route Management page, select the route to which you want to attach a document.
  2. Select Documents.
    A list of documents attached to the route or to an individual operation in the route appears.
    Tip: You can access a list of documents attached to each operation by selecting the corresponding operation.
  3. If you want to attach the document to the route, select ALL OPERATIONS. If you want to attach the document to an operation, select the operation.
    A list of documents attached to the route or operation appears.
  4. Select .
    The Attach Documents and/or URLs window appears, displaying a list of documents that are available.
    Tip:
    • You can preview a document by selecting the URL in the FILE/URL column.
    • By default, the latest version of each document appears in the list. If you want to attach a previous version of a document, in the row containing the document, select .
  5. In each row containing the document that you want to attach, select the check box.
    Tip: You can select all the documents in the list by selecting the check box in the column heading.
  6. Select Attach.

Results

The document is attached to the route or operation.

Next Steps

Assign a property group to the route or operation.

Assign a Property Group

About This Task

When you assign a property group to a route, you can provide values for custom properties that are specific to the route. For example, if the route is for assembling a motor, you can provide the assembly line number, types of motors that are normally assembled on the line, and other details specific to the route.

You can assign a property group to a route or an operation.

Before You Begin

Ensure that the property group and underlying properties have been defined in the Property Definition module. For more information, refer to Property Definition.

Procedure

  1. In the Route Management page, select the route to which you want to assign a property group.
  2. Select Properties.
    A list of property groups assigned to the route appears.
  3. If you want to assign a property group to an operation, select the operation. If you want to assign a property group to the route, select ALL OPERATIONS.
  4. Select .
    The Assign Property Group(s) window appears.
  5. Select the check boxes corresponding to the property groups that you want to assign.
    Tip: If you want to assign all the property groups, select the check box in the heading.
  6. Select Assign.

Results

The selected property groups are assigned to the route or operation.
Tip: By default, the latest version of each property is assigned to the route or operation. If you want to assign an earlier version, select in the ACTIONS column, and then select the version that you want to assign.

Next Steps

Provide values for each property in the group.

Provide Values for Properties

About This Task

When properties are defined in Plant Applications, default value for each property may be provided. Using Route Management, you can provide values for each property (and overwrite default values if they exist).

Before You Begin

Procedure

  1. In the Route Management page, select the route for which you want to provide values for properties.
  2. Select Properties.
    A list of property groups assigned to the route appears.
    Tip: If the property has been assigned to an operation, you can select the operation to access a list of property groups assigned to the operation (instead of accessing property groups assigned to all the operations in the route).
  3. Select corresponding to the property group for which you want to provide values.
    A list of properties in the property group appears. If a default value has been provided for a property in the Property Definition module, it appears in the VALUE column.
  4. Enter or modify the value in the VALUE column for each property for which you want to provide a value. The following conditions apply when you provide a value for a property:
    • If a property has been specified as mandatory in the Property Definition module, you must provide a value for the property.
    • The value must be of the same data type as specified in the DATA TYPE column.
  5. Select Save.

Results

The values for the properties are saved.

Next Steps

Release the route.