Proficy Historian for Cloud
Create an MQTT Collector
Before you begin
- Deploy Proficy Historian for AWS.
- Install collectors. You can install them on-premises or on a VPC (which can be different from the one on which Proficy Historian for AWS is deployed).
About this task
Supported MQTT versions:
- MQTT V5
- MQTT V3.1.1
Supported data formats:
- Sparkplug B V1.0
- KairosDB (that is, the Predix Timeseries format)
Features:
- You can subscribe for multiple-level topics using a wildcard.
- Only the unsolicited data collection is supported; polled collection is not supported.
- The timestamp resolution is seconds, milliseconds, and microseconds.
- Boolean, floating point, integer, and string data types are supported.
How it works: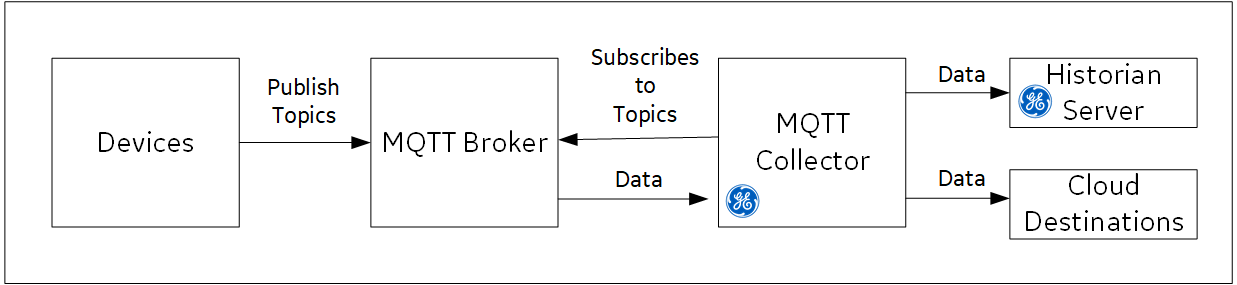
- The MQTT collector connects to an MQTT broker and subscribes to a topic. You can use username/password-based authentication or certificate-based authentication. Transport Layer Security (TLS) authentication is used for subscribing the data from message broker to avoid middleware attacks so that the data is securely transferred from message broker to the MQTT collector.
- The collector converts the data from the Sparkplug B v1.0 or the KairosDB format to a Historian-understandable format.
- It verifies whether the tag is available in Historian; if not, it will add the tag and then add the data samples, and streams the data to the Historian server or a cloud destination.
KairosDB Message Format:
{
"body":
[
    {
        "attributes":{"machine_type":"<value>"},
        "datapoints":[[<value>,<value>,<value>]],
        "name":"<value>"}],
"messageId":"<value>"}| JSON Parameter | Description | Required/Optional |
|---|---|---|
| machine_type | The name of the machine from which you want to collect data. | Optional |
| datapoints | Time (in epoch format), value, and quality. | Required |
| name | The tag name | Required |
| messageId | The type of the message | Optional |
Note: For the parameters marked optional, you need not enter values. However, you must enter the parameter names. For example:
{"body":[{"attributes":{"machine_type":" "},
"datapoints":[[1558110998983,9547909,3]],"name":"QuadInteger"}],"messageId":" "}
Supported Data Types
| Source Data Type | Historian Data Type |
|---|---|
| DoubleFloat, DoubleInteger, FixedByte, QuadInteger, SingleFloat | ihDoubleFloat |
| ByteString, String | ihVariableString |
| Boolean | ihBool |
Procedure
- Run Command Prompt as an administrator.
- Run the CloudHistorianConfigurationUtility.exe file. It is provided along with the collectors installer. After you install collectors, it will be available in the C:\Program Files\GE Digital\Historian Cloud Config folder by default.
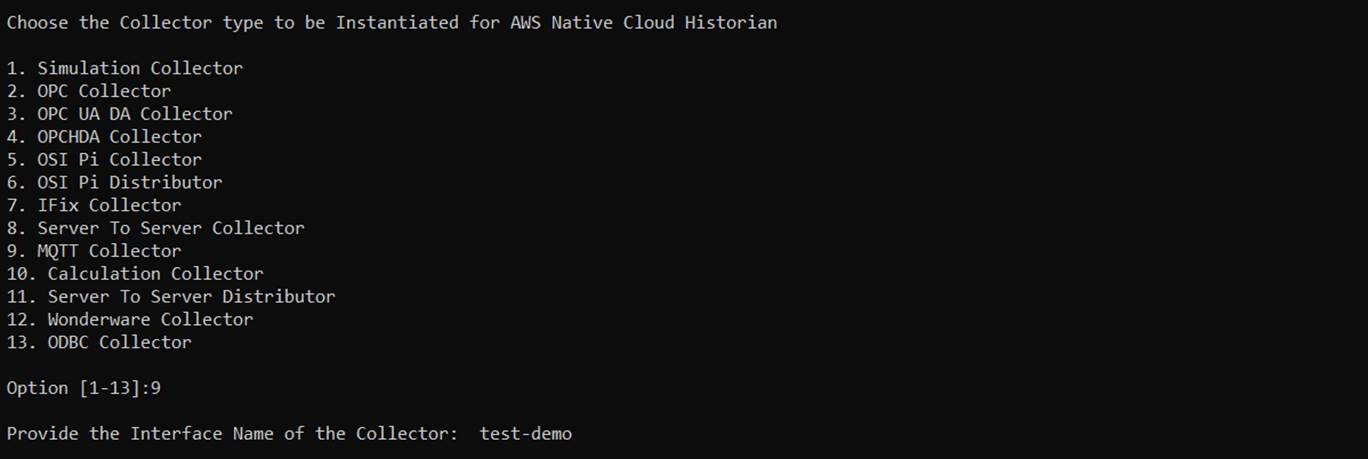
- Enter the number corresponding to creating a collector instance.
- Enter the number corresponding to the collector that you want to create.
-
Enter the following details:
Field Description Interface Name Enter the name that you want to provide for the collector instance. A value is required and must be unique in the DNS. NLB DNS Enter the Amazon Network Load Balancer (NLB) DNS. A value is required.
Tip: To find the NLB DNS:- Access the EKS cluster on which you have deployed Proficy Historian for AWS.
- Access the EC2 instance.
- In the navigation pane, under Load Balancing, select Load Balancers.
- Select the load balancer for which you want to find the DNS.
- In the Description section, copy the DNS name.
Username Enter the username to connect to Proficy Historian for AWS. A value is required. Password Enter the password to connect to Proficy Historian for AWS. A value is required. Tip: For the default user, ihCloudHistAdmin, this is the value you entered in the Password field under UAA Configuration when you created the stack.MQTT server Enter the IP address or host name of the MQTT broker using which you want to collect data. A value is required. By default, it considers the local host name. MQTT topic Enter the MQTT topic from which you want to collect data. A value is required. You can enter multiple topics separated by commas. If you want to use the SparkplugB format, enter a value in the following format:
namespace/group_id/message_type/edge_node_id/device_idwhere:namespaceis the Sparkplug version. Enter spBv1.0.group_idis the ID of the group of nodes from which you want to collect data.message_typeis the message type from which you want to collect data. The collector processes data only from NDATA and DDATA message types.edge_node_idis used to identify the MQTT EoN node within the infrastructure.device_ida device attached to the MQTT EoN node either physically or logically.
MQTT port Enter the port number of the MQTT broker. A value is required. Quality of service Enter the quality of service that you want to use while collecting data from an MQTT broker. - 0: Indicates that the message is delivered at most once or it is not delivered at all.
- 1: Indicates that the message is always delivered at least once.
- 2: Indicates that the message is delivered once.
MQTT version Enter the version of the MQTT broker that you want to use. Clean session Enter one of the following values: - true: Enter this value if you do not want to create a new session when the MQTT broker and the collector are disconnected from each other.
- false: Enter this value if you want to retain the session when the MQTT broker and the collector are disconnected from each other. This ensures that there is no loss of data. If you want to choose this option, ensure that you have entered 1 or 2 for the quality of service.
-
If you do not want to use MQTT broker authentication, for the Authentication enabled for MQTT broker field, enter N.
The MQTT collector is created and started.
-
If you want to use certificate-based authentication to connect to the MQTT broker, enter values as described in the following table.
Field Description Authentication enabled for MQTT broker Enter Y. Certificate-based authentication Enter Y. Root CA server certificate file path Enter the path to the CA server root file to connect to the MQTT broker. A value is required. Client certificate file path Enter the path to the client certificate file to connect to the MQTT broker. A value is required. Client key file path Enter the path to the private key file to connect to the MQTT broker. A value is required. The MQTT collector is created and started. -
If you want to use username-password-based authentication to connect to the MQTT broker, enter values as described in the following table.
Field Description Authentication enabled for MQTT broker Enter Y. Certificate-based authentication Enter N. MQTT username Enter the username to connect to the MQTT broker. A value is required. MQTT password Enter the password to connect to the MQTT broker. A value is required. The MQTT collector is created and started.
Connecting the MQTT Collector to the IOT Core
Procedure
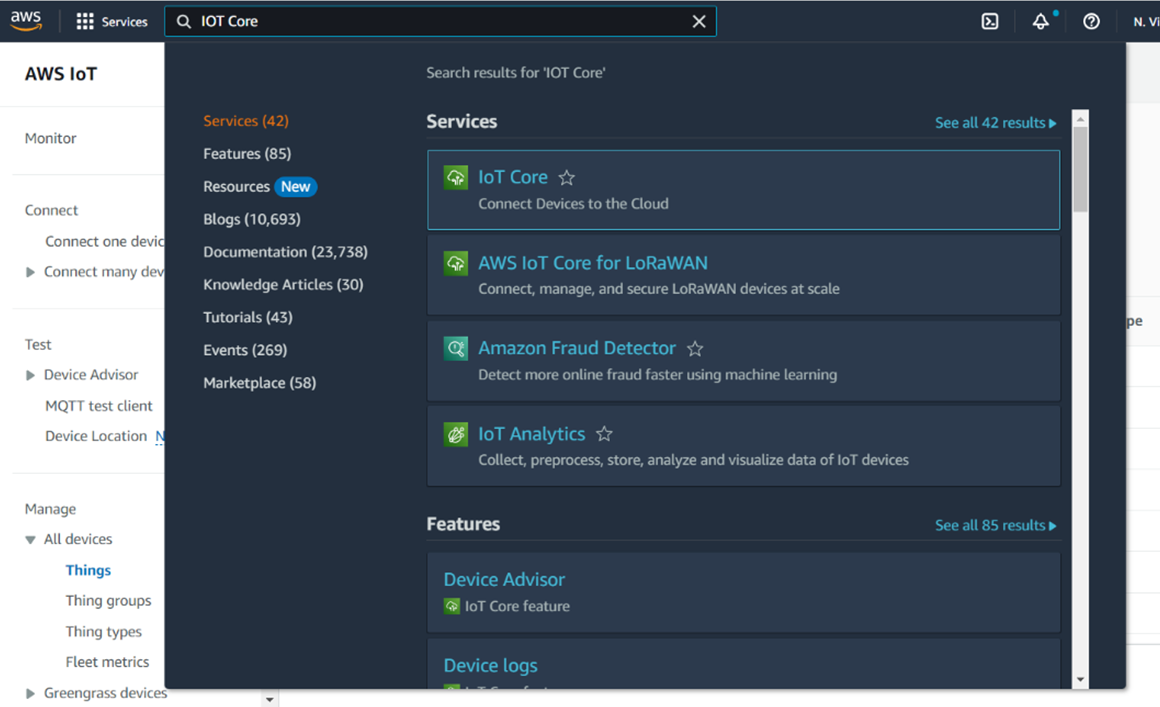
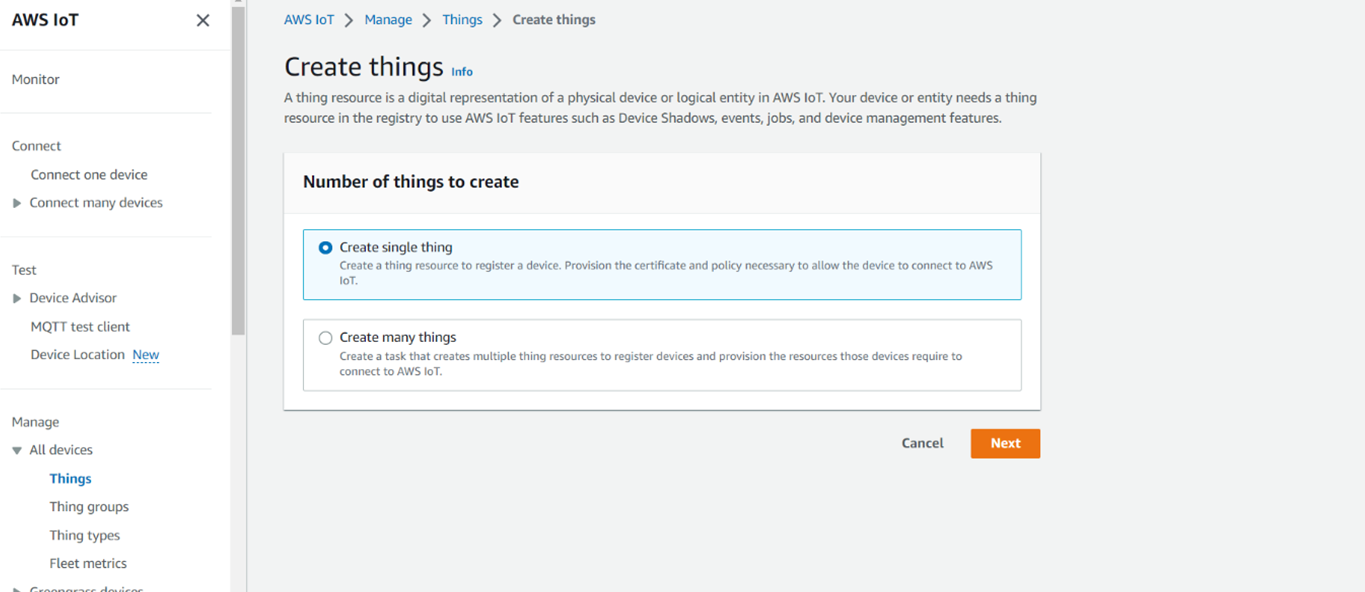
-
In the AWS console, search for the IOT core as shown
in the following figure.
-
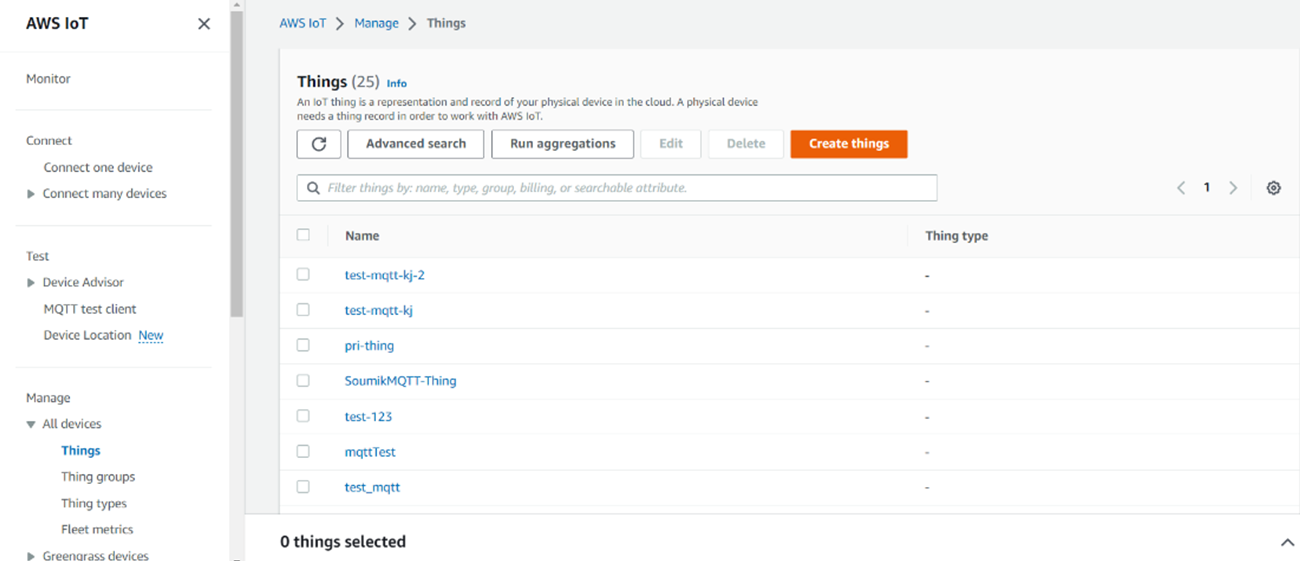
In the navigation pane, select All Devices and then
Things.
-
Select Create things, and then select
Create single thing and click
Next.
-
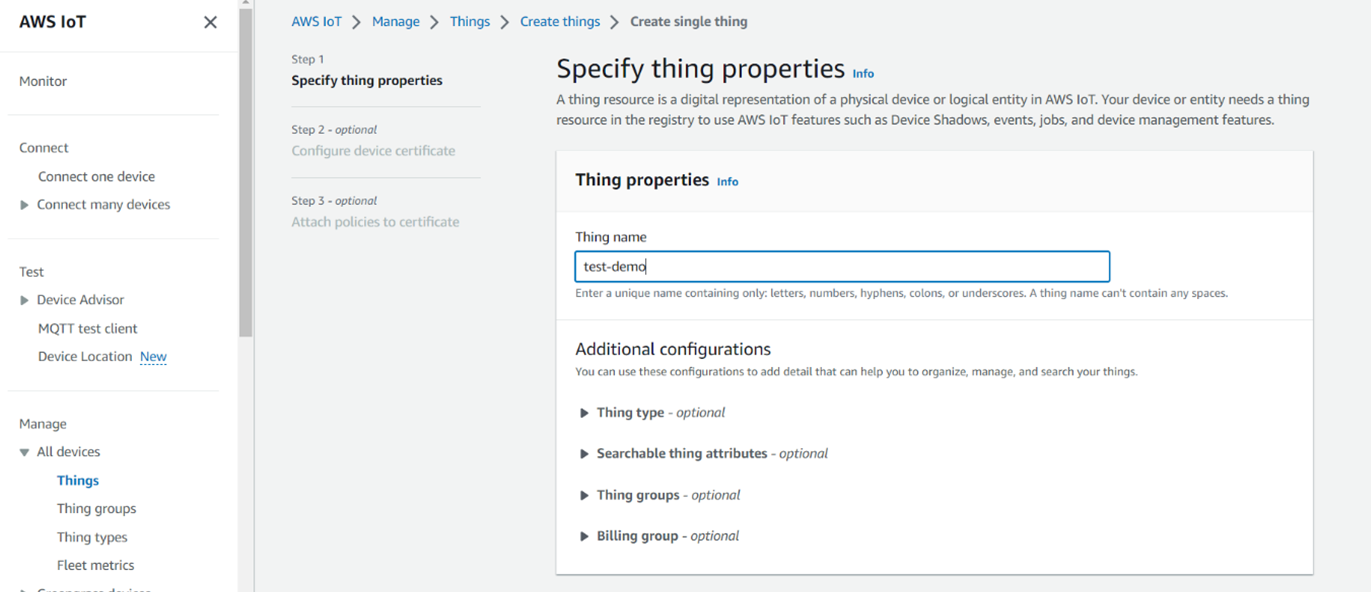
Provide the thing name and keep the default configurations as is, and then
click on Next.
-
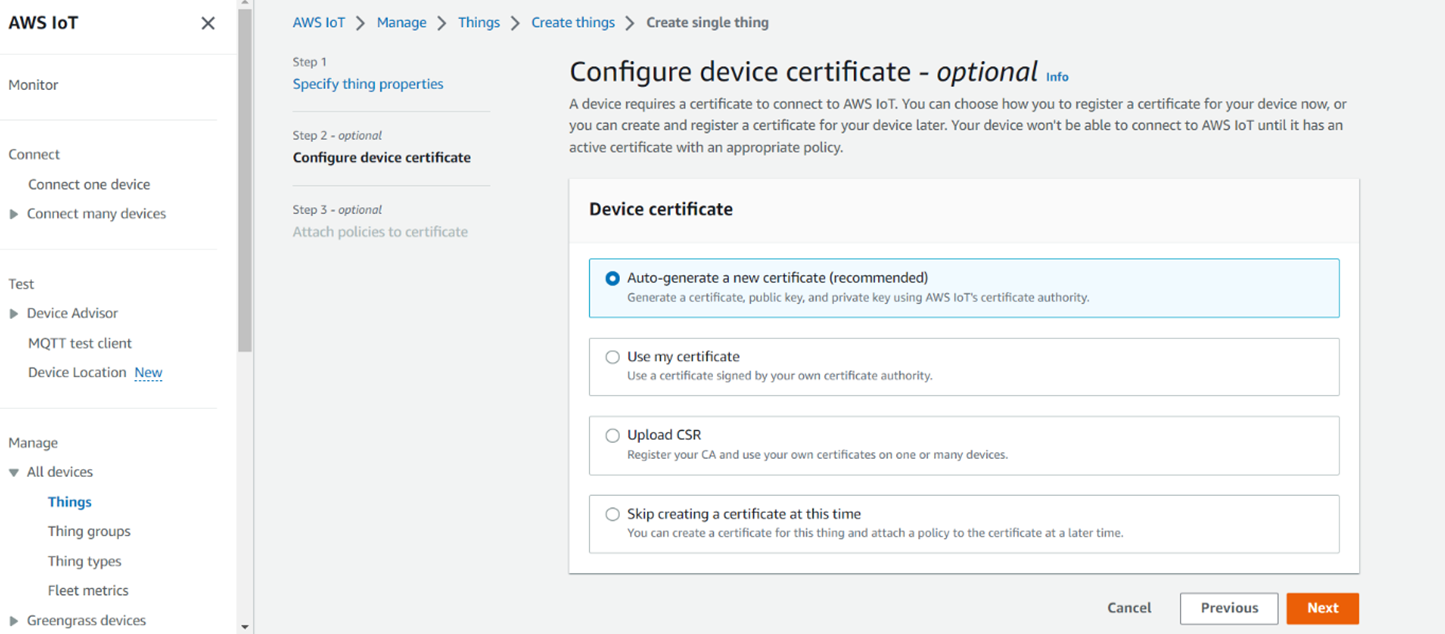
In Configure Device certificate screen, use the default options and leave
Auto-generate a new certificate selected, and
then click Next.
-
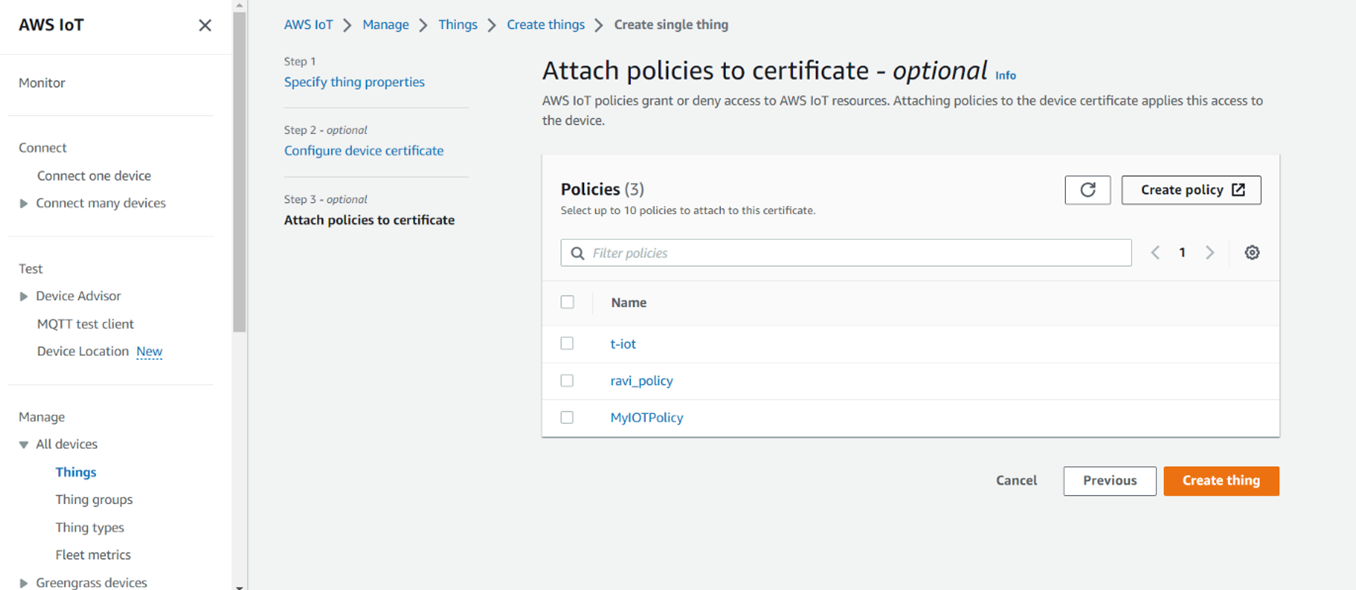
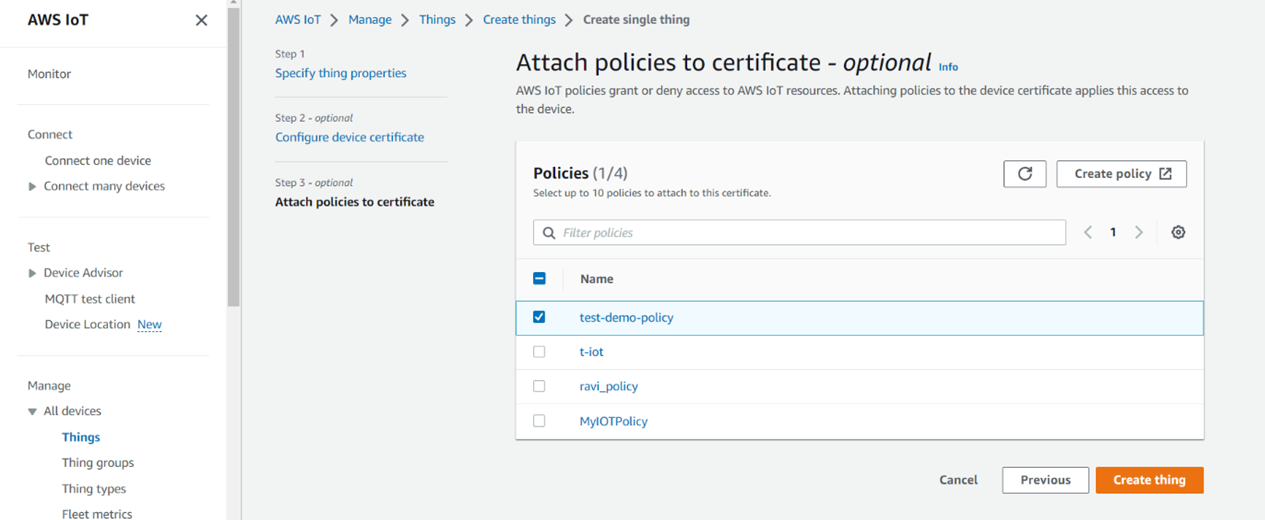
Attach the policy to the things if you have existing ones, or else create a
new policy.
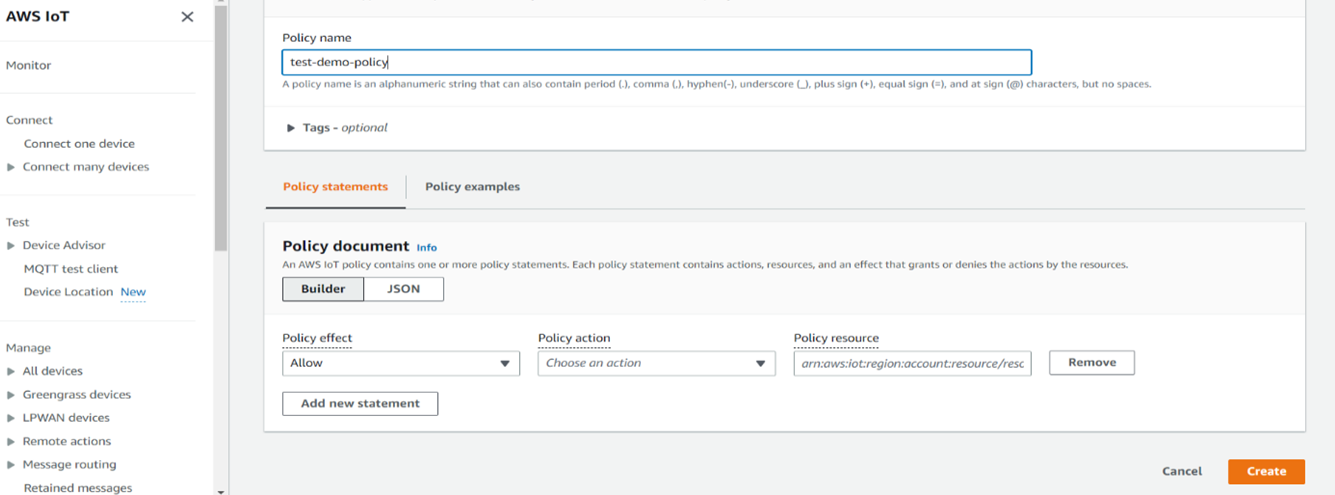
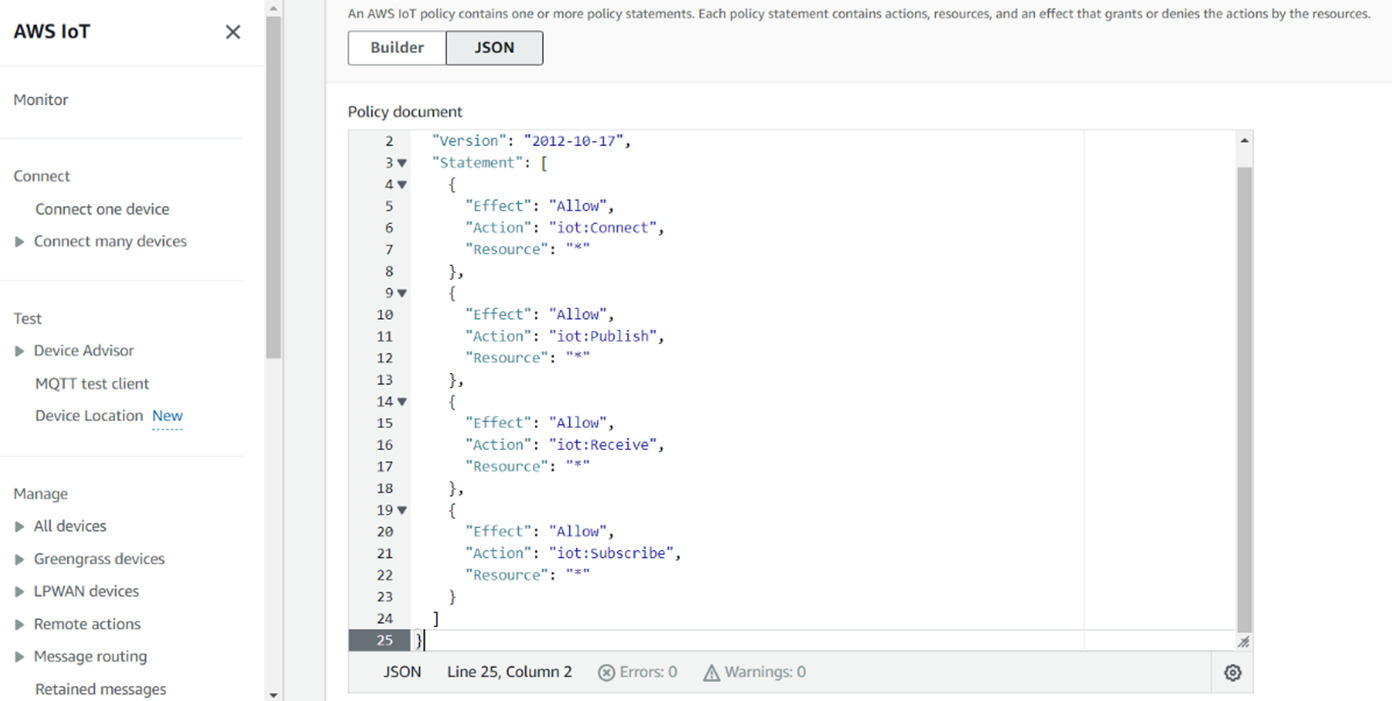
-
Provide the Policy name and attach the same
permissions as shown in the following figure and select
Create.
-
Select the policy you created, and then click Create
thing.
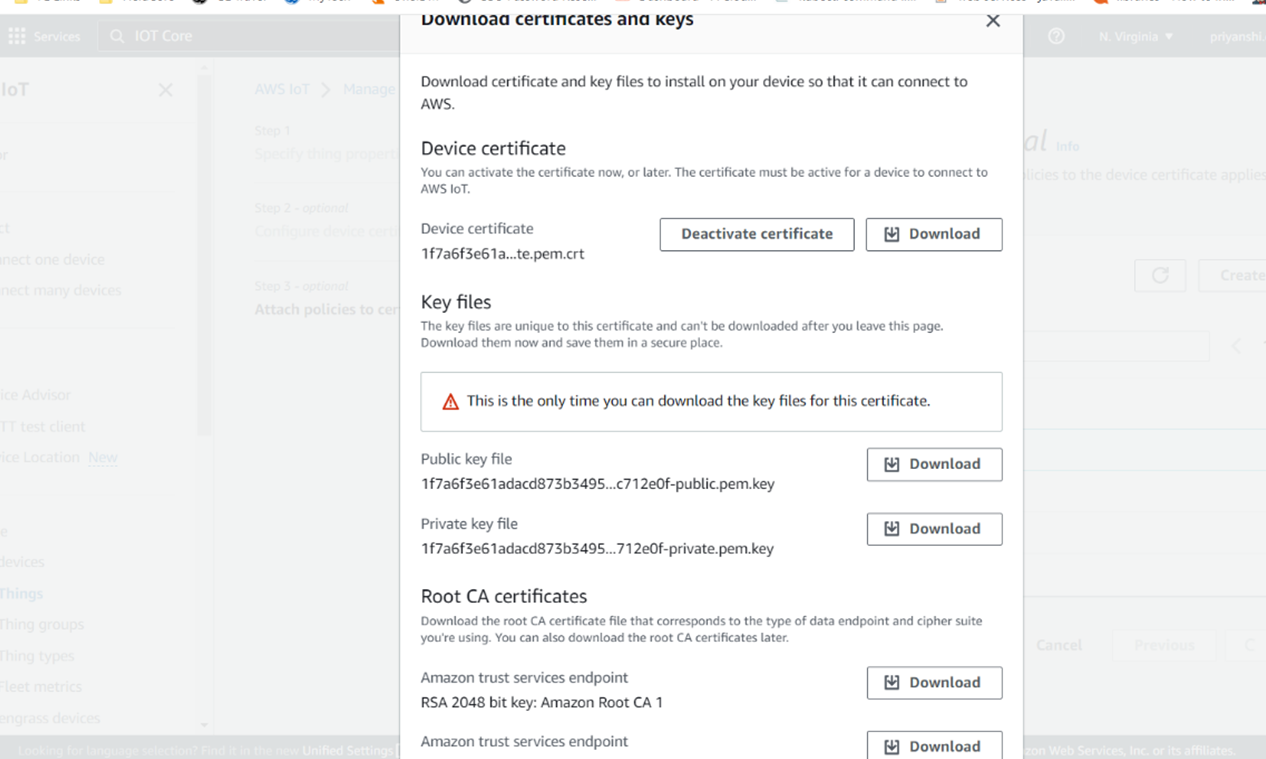
-
Download all the certificates and key files that have been
created.
-
After the things are created, select the things and click the Interact
tab.
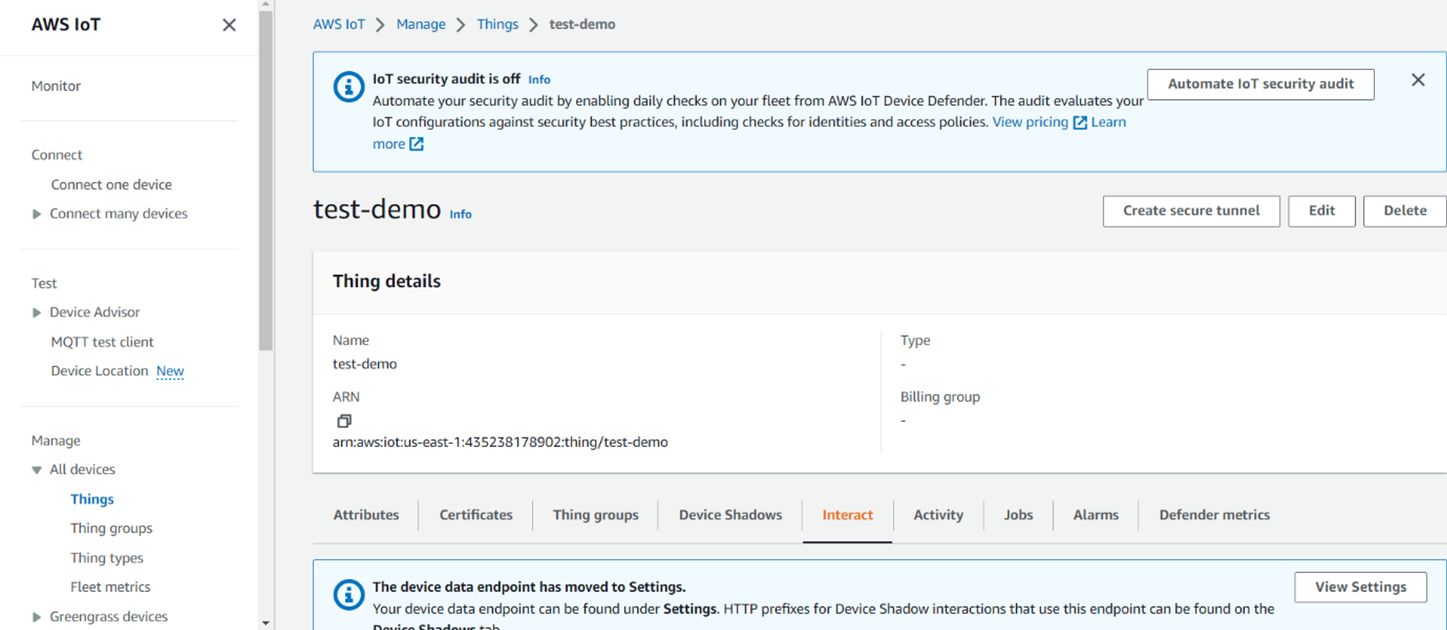
-
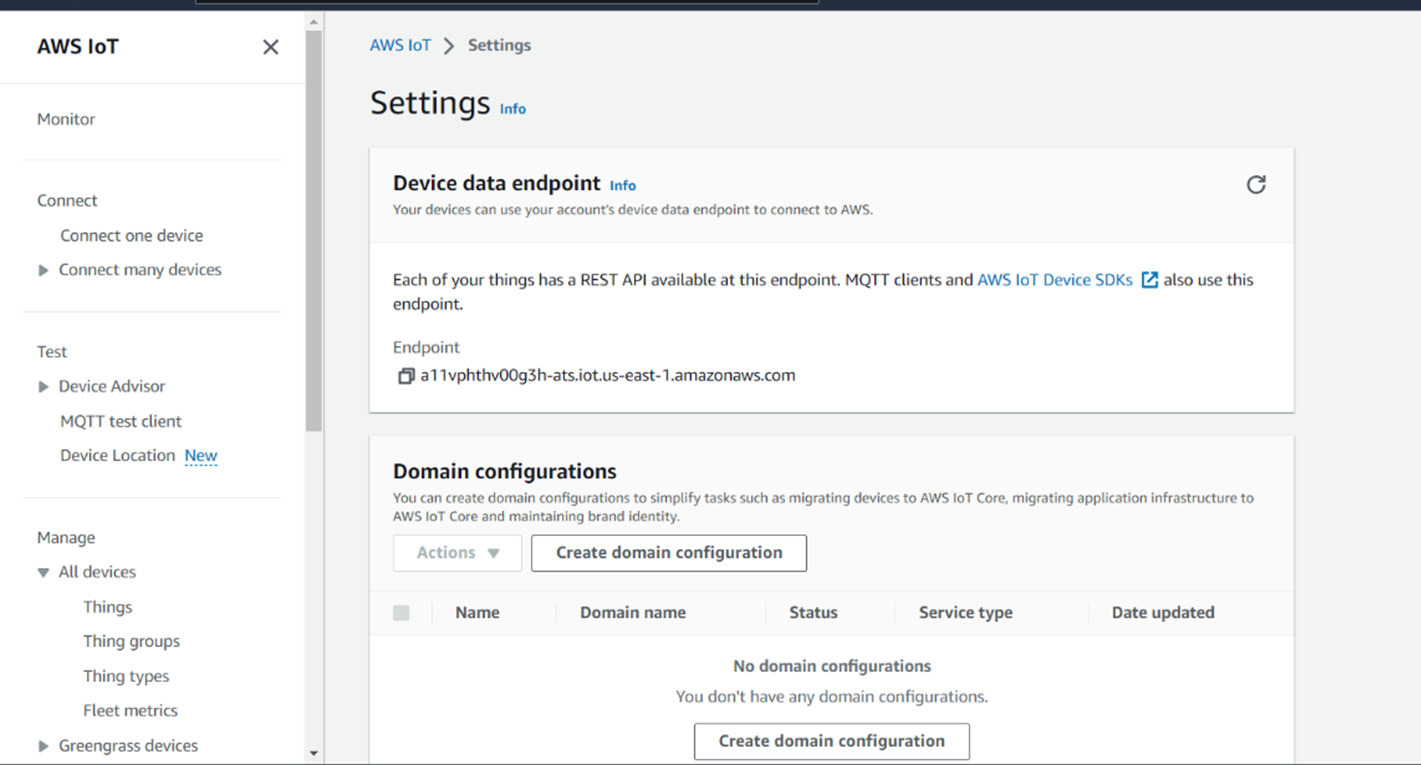
Copy the Endpoint that will be used for creating the MQTT collector.
-
On the left side of the Test tab, click on the MQTT test client.
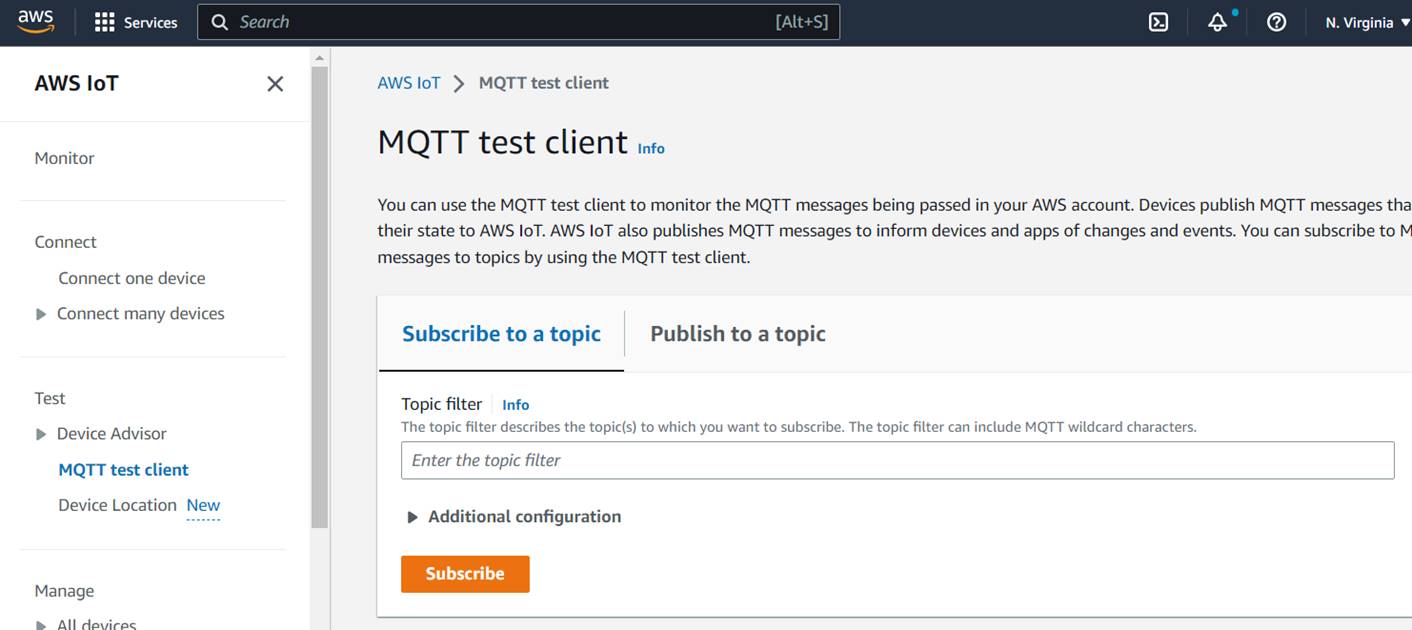
-
Create a topic of your choice and then Subscribe to
it.

-
Before publishing the topic, run the
CloudHistorianConfigurationUtility.exe
configuration utility and create the MQTT collector instance. After you
install collectors, it will be available in the C:\Program
Files\GE Digital\Historian Cloud Config folder by
default.
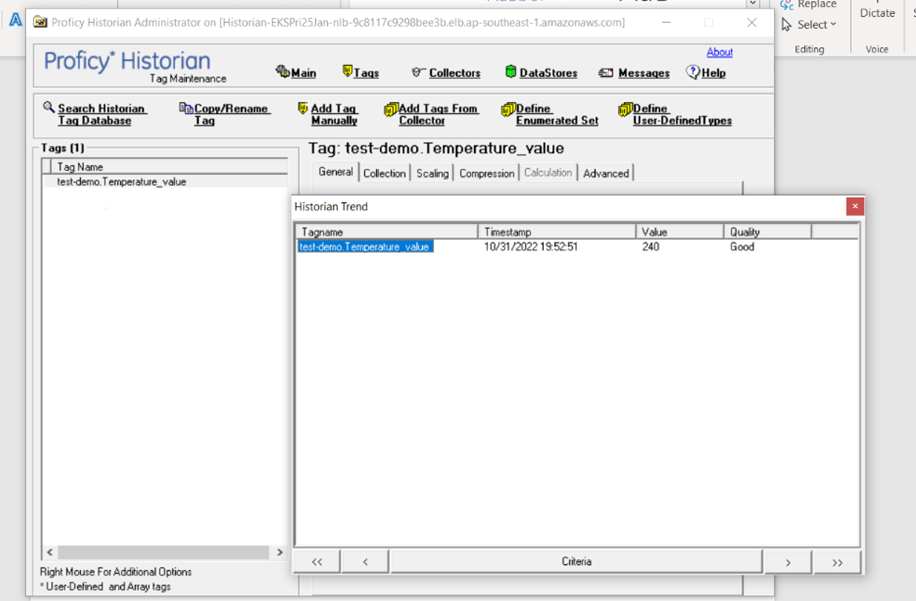
Note: The name of the collector interface should be name that you have provide while creating things. Our thing's name was "test-demo," as shown in the following figure.
-
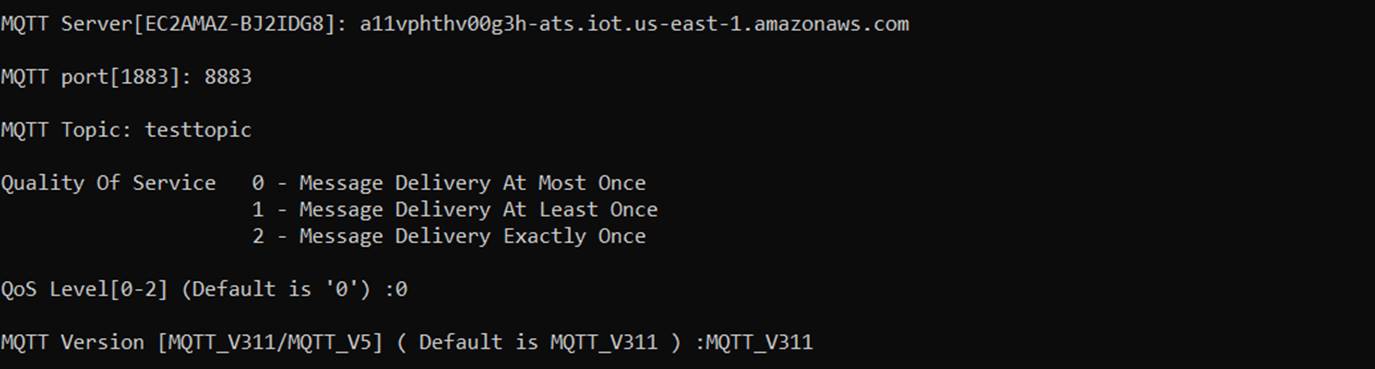
Next provide the NLB DNS, the user name, and password. For the MQTT server,
provide the ENDPOINT you created in step 11.

-
Make sure that the default port for the AWS IOT core is 8883, and the MQTT
topic should be the one you created in step 13. QOS should be zero (0), by
default.
-
For the IOT core, select yes (Y) for Authentication and Certification, and
provide the paths as shown in the following example.
 Note: Save the AmazonRootCA1.pem as a .crt file using Notepad or another text editor. And, in the client key file path provide the private key file path.
 -
Confirm that you can see your collector running, as shown in the following
figure.

-
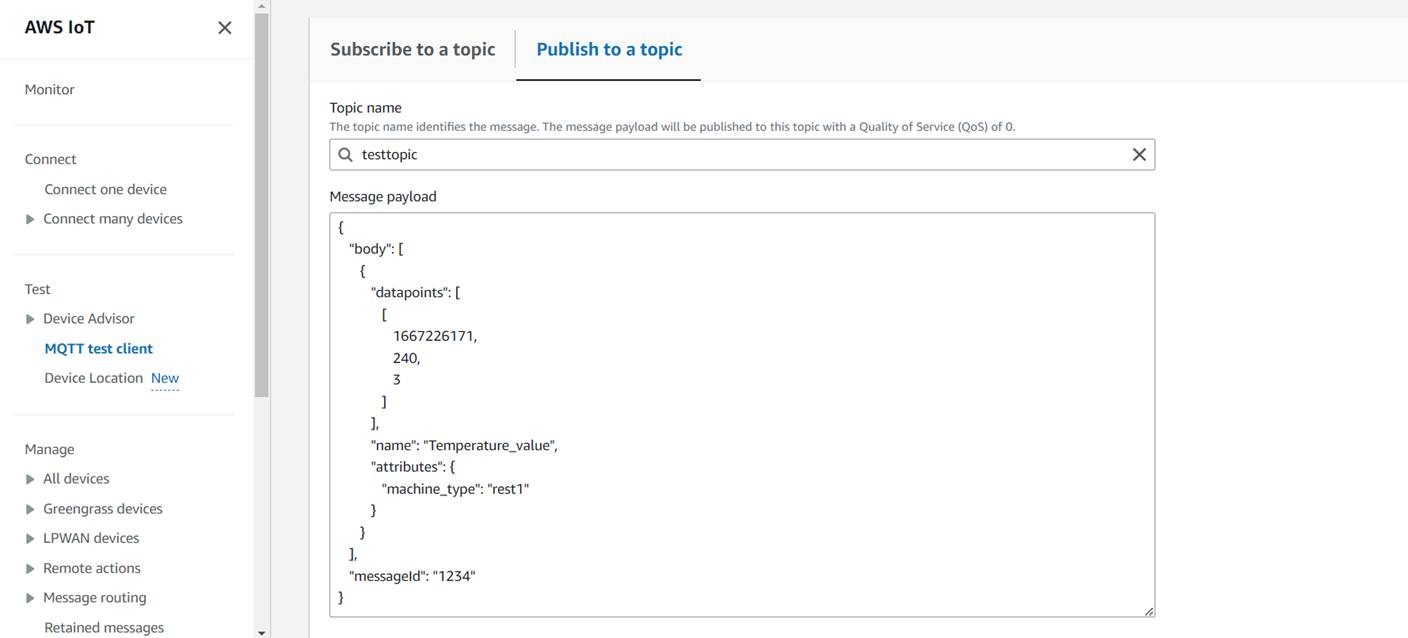
Now go to the MQTT test client, and publish the message payload to the
topic you have just subscribed to:
-
Confirm that you can see the tag and sample in the Historian Administrator
for that tag you have added, as shown in the following example.