 Operations Hub
Add Historian or Custom REST Data Source
Creates a Historian or Custom REST data source.
Before you begin
Procedure
-
Select the check box for Enable System Connection and
provide these details to authenticate the Historian system API:
Field Description Hostname Enter the hostname of the Historian data source. Authentication Required Select the check box if connecting to the data source requires authentication. Enter the Username and
Password of the user who can access the APIs.Test Select to verify the authentication details. A message appears, confirming whether connection to the system API is established. -
Select the check box for Enable REST Connection and provide
these details:
Field Description Base URL Enter the URL of the data source in the following format: https://<host name or IP address of the data source>:<port number> Note: The port number should not be used if your data source is Historian 8.x.REST Authentication Required Select the check box if authentication to a REST API is required. If selected, Operations Hub sends authorization details along with a request while connecting to a data source. Auth Type Appears when the REST Authentication Required check box is selected. Select one of the following types of authentication:- Basic Auth: Sends a verified user name and password along with the request.
- Bearer Token: Sends an access key along with the request.
- OAuth: Retrieves an access key to access an API, and then uses the key to authenticate future requests.
Depending on the authentication type you select, a few boxes appear.
Auth Token Appears when the Bearer Token authentication type is selected. Enter the access key required to authenticate the APIs. The access key is included in the request header.
Auth Grant Type Appears when the OAuth authentication type is selected. Select one of the following types of granting the authentication:- client_credentials
- password
Auth URL Enter the URL for the endpoint of the authentication server. This value is used to exchange the authorization code for an access token. Auth Client Id Appears when the OAuth authentication type is selected. The client identifier issued to the client during the application registration process.
Auth Client Secret Appears when the OAuth authentication type is selected. The client secret issued to the client during the application registration process.
Ignore TLS/SSL Select the check box if verifying SSL certification can be ignored. Normally, this check box is cleared when using the data source in a production environment, which implies that SSL certification will be verified while connecting to the data source. If, however, you want to troubleshoot issues with connecting to a data source, you may select this check box to isolate certification issues. Certificate Required Select the check box if connecting to the data source requires SSL certificates. Select Choose Certificate to browse to your system and add certificates.
Auth Certificate If you want to provide a certificate for authentication, select Choose Certificate and navigate to the certificate. Alternatively, you can select the Use Datasource Certificate check box if you want to use the same certificate that is used by the data source. Note: You can use certificates only in the base-64-encoded format. A DER-encoded certificate is not supported.Test Select to test the connection. A message appears, confirming whether token from the OAuth data source is retrieved. The connection is tested using the authentication details of the REST APIs, including the authentication URL; the data source base URL is not used. Note: You can create multiple data sources with the same URL. After you restart the services, the Data Distributor service uses the most recently saved System API authentication settings for the URL. Therefore, if the most recently saved credentials do not work, you cannot connect to the data source. To fix this issue, modify the data source to specify working credentials, and then test the data source. We recommend that you do not save the data sources that do not pass the test or data sources with the same URL. -
Select Save.
Look at the following examples for configuring a data source for Historian 7.x and Historian 8.x.
Historian 7.x requires entry of port used – in this instance, port 8443 – whereas Historian 8.x does not require any port to be specified.
The Auth Client ID is admin for Historian 7.x, whereas Historian 8.x requires the Auth Client ID to be of the form MachineName.admin, where MachineName is case sensitive.
Example of Historian 7.2 Data Source:

Example of Historian 8 Data Source:
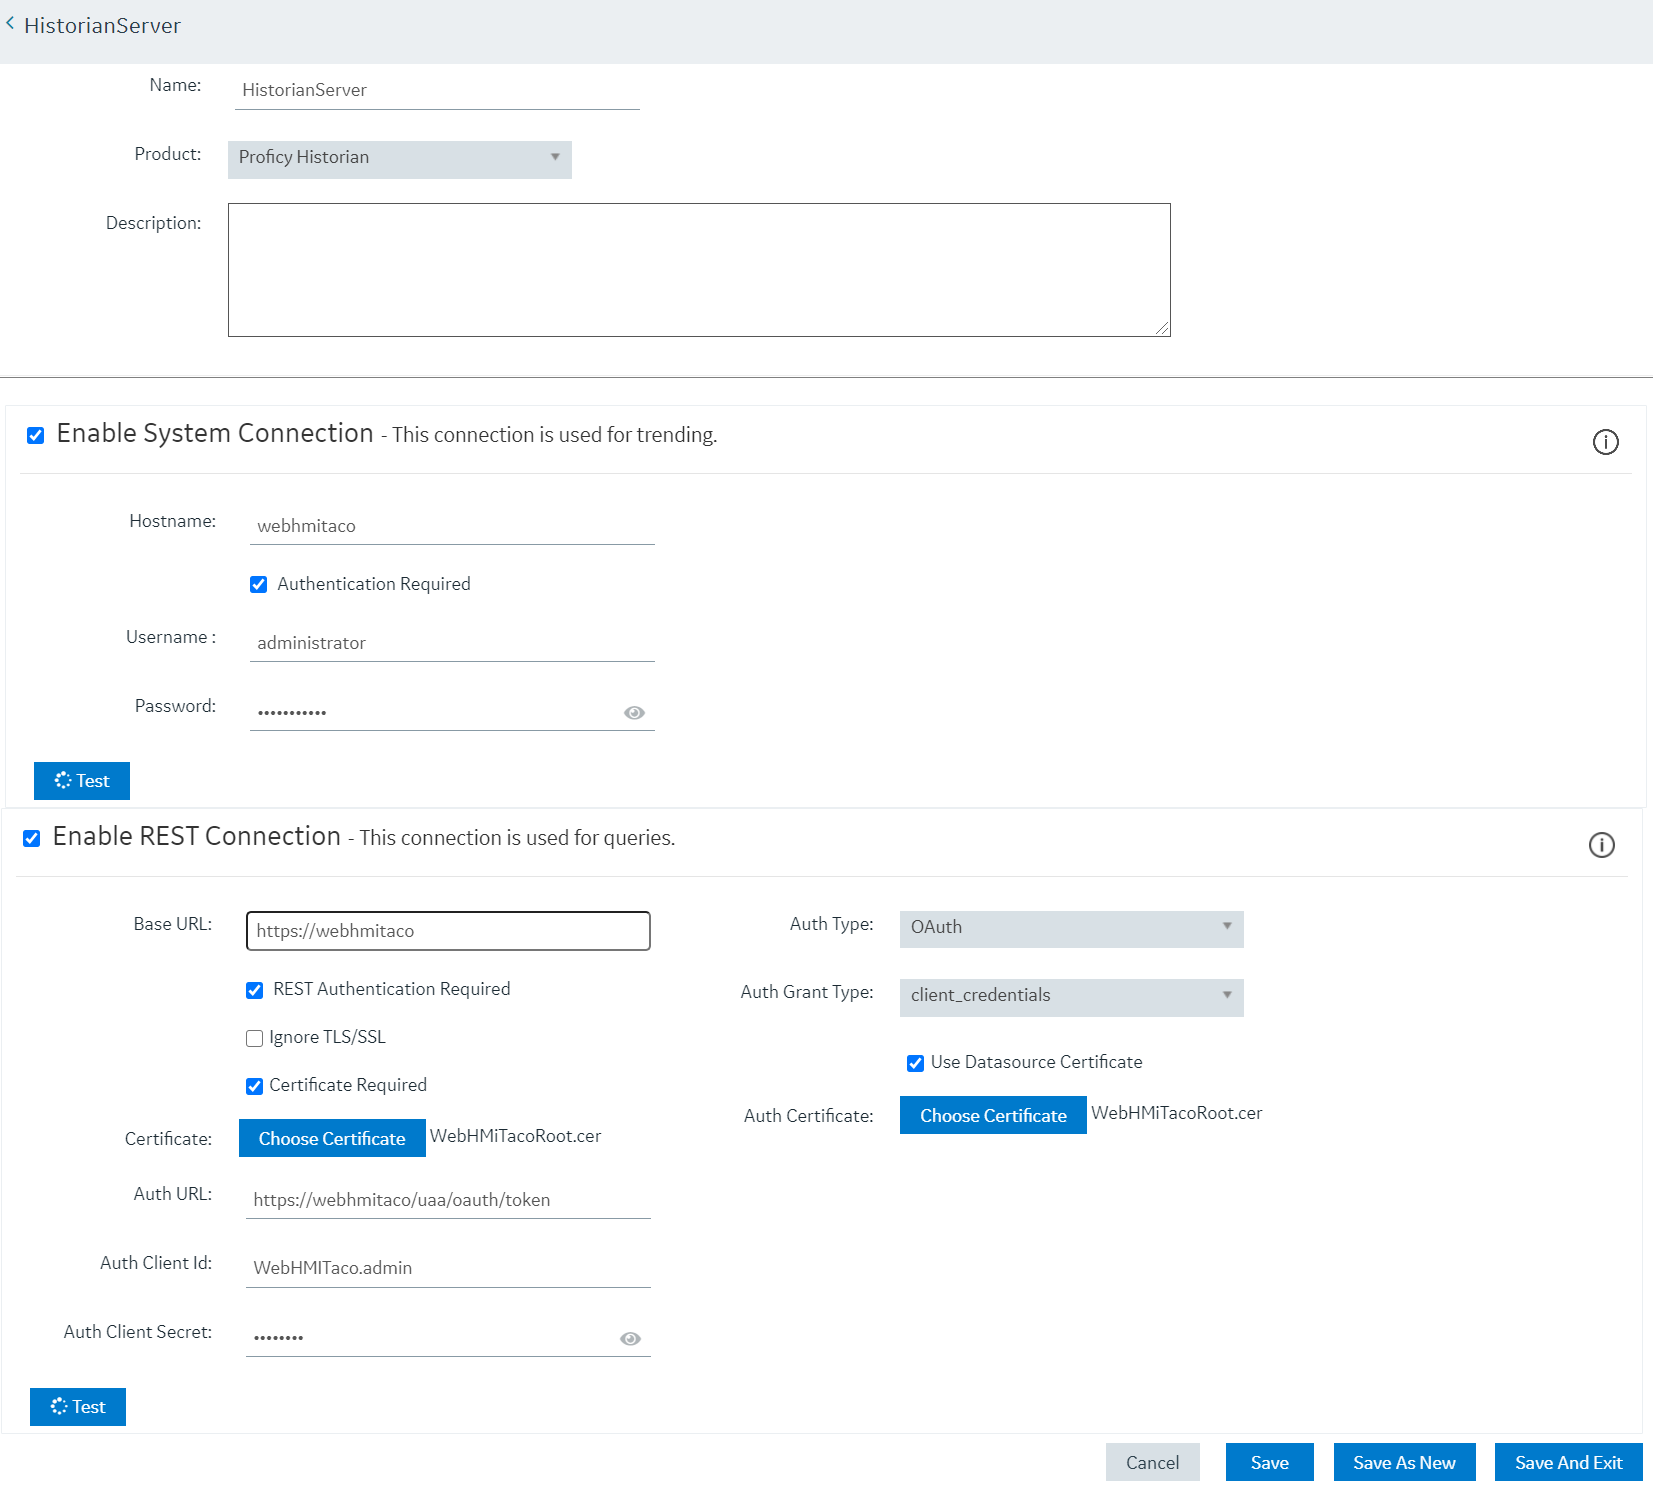 Note: The Auth Client ID field is case sensitive. For example, if the Historian server name is hist8Server, the user must use hist8Server.admin and not HIST8Server.admin or Hist8Server.admin, otherwise REST authentication will fail.