
Add LDAP Identity Provider
This topic describes how to add a LDAP account in Proficy Authentication.
Before you begin
About this task
Procedure
- Go to .
-
Select
 and then select
LDAP.
and then select
LDAP.

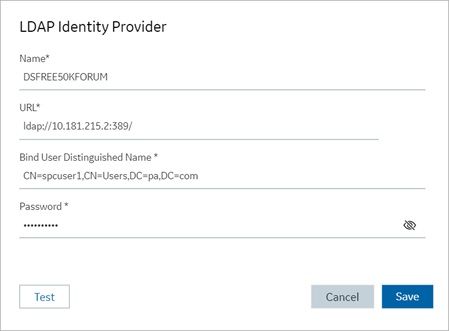
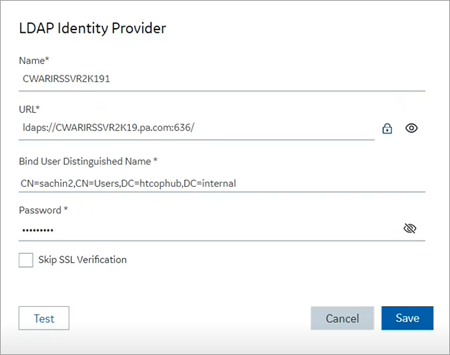
The LDAP Identity Provider screen appears.
-
Enter the following details:
Field Description Name A unique name to help identify your LDAP connection. URL The URL of the LDAP server. The trailing slash (/) must be included at the end of the URL. You can use LDAP with or without secure authentication in the following format:- Insecure port:
ldap://100.100.100.2:389/ - Secure port:
ldaps://100.100.100.2:636/
Important: In a URL address, ensure thatldapis in lowercase. Using uppercase letters will render the address non-functional.You can also use a fully qualified domain name instead of an IP address.
For a secure port, provide user credentials.
Bind User Distinguished Name This is a distinguished LDAP user name to represent various entities within an LDAP directory hierarchy, including users, groups, and organizational units. The canonical format consists of CN (Common Name), DC (Domain Component), and OU (Organization Unit Name). CN and DC are mandatory, while OU is optional.
Enter the LDAP Distinguished Name in compliance with LDAP standards to ensure proper processing by the system. In the following example, each component (CN, OU, DC) is correctly formatted, separated by commas without any spaces, and is case sensitive.
CN=John
                              Smith,OU=Factory,DC=Company,DC=COM
Play the video: How to retrieve the User Distinguished Name required for establishing or modifying the LDAP connection
Password The password to log in to the LDAP server if you choose secure authentication. Test Tests the connection to the LDAP server. If the URL and login details are correct, you will receive a test successful message. Skip SSL Verification This option appears only when you choose a secure port for LDAP. Select this check box if you want to skip establishing a secure connection between client and server for exchanging LDAP data.
Clear the check box to allow SSL verification. Refer to step 4.
- Insecure port:
-
If you choose to secure LDAP, select
 for SSL verification.
A message appears when the security certificate is trusted and added to the store.
for SSL verification.
A message appears when the security certificate is trusted and added to the store.In case the certificate is not added automatically, the following message appears.

Select Browse to navigate and choose the server certificate from your local system.
- Optional:
Select
 next to the lock icon to view the certificate.

-
Select Save.
Play the video to watch this task in action: How to create a new LDAP connection