
Central Registration
If you did not register your Proficy product with Configuration Hub during product installation, you must take additional steps (after you have installed both Configuration Hub and Proficy Authentication) to register your Proficy product (such as iFIX, CIMPLICITY, Operations Hub, or Historian) with Configuration Hub.
About this task
- During product installation, you have the option to skip providing the Configuration Hub and Proficy Authentication server details. After successful installation, use the Node Manager Configuration Utility installed on the desktop to configure the Node Manager and update the product(s) with Proficy Authentication.
- If you want to use a Configuration Hub server on a computer that is not on the local machine, you will need to register with the Configuration Hub server on the remote computer.
- If you configured Configuration Hub with your Proficy product and now you want to change to a remote Configuration Hub server, you will need to unregister Configuration Hub on the local machine first, and then register with the remote Configuration Hub server.
- Any time that you install Proficy software without registering that software with Configuration Hub during install, you will need to run the Node Manager utility on the desktop before you can see that software show up centrally in the Configuration Hub > Administration > Node Manager panel.
Procedure
-
Use the desktop icon to run the
 Node Manager Configuration Utility with administrator
privileges.
The Node Manager Configuration window appears.
Node Manager Configuration Utility with administrator
privileges.
The Node Manager Configuration window appears.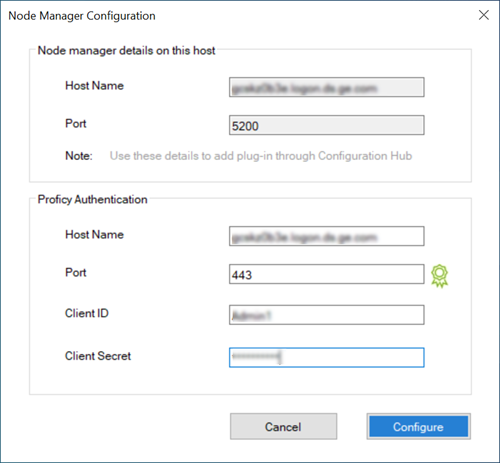
-
Configure the Node Manager as follows:
- Proficy Authentication
- Host Name: The name of the Proficy Authentication server to which you want to update the product(s) with Proficy Authentication, in the <Fully Qualified Domain Name> format.
- Port: The port number of the Proficy Authentication server.
- Client Id: The client ID of the Proficy Authentication server, provided during the Proficy Authentication installation.
- Client Secret: The client secret of the Proficy Authentication server, provided during the Proficy Authentication installation.
Note: If the root certificate of the Proficy Authentication server is not trusted, click not trusted ; the Certificate Details
page appears. Click Trust to trust the root
certificate.
; the Certificate Details
page appears. Click Trust to trust the root
certificate.The root certificate is trusted
 .
.
- Node manager details on this host
- Host Name: The name of the node server where the product is installed, in the <Fully Qualified Domain Name> format. This field is automatically populated and disabled.
- Port: The node manager port number where the product is installed. The port number field is disabled.
Note: Ensure that you enter the same host details to integrate the product plug-in(s) in Node Manager within Configuration Hub and proceed with the registration of the product(s) on the node in Configuration Hub.
- Proficy Authentication
-
Click Configure.
The following message appears.
Successfully updated Proficy authentication for Products <product(s) installed>.
-
Double-click the
 Configuration Hub desktop shortcut.
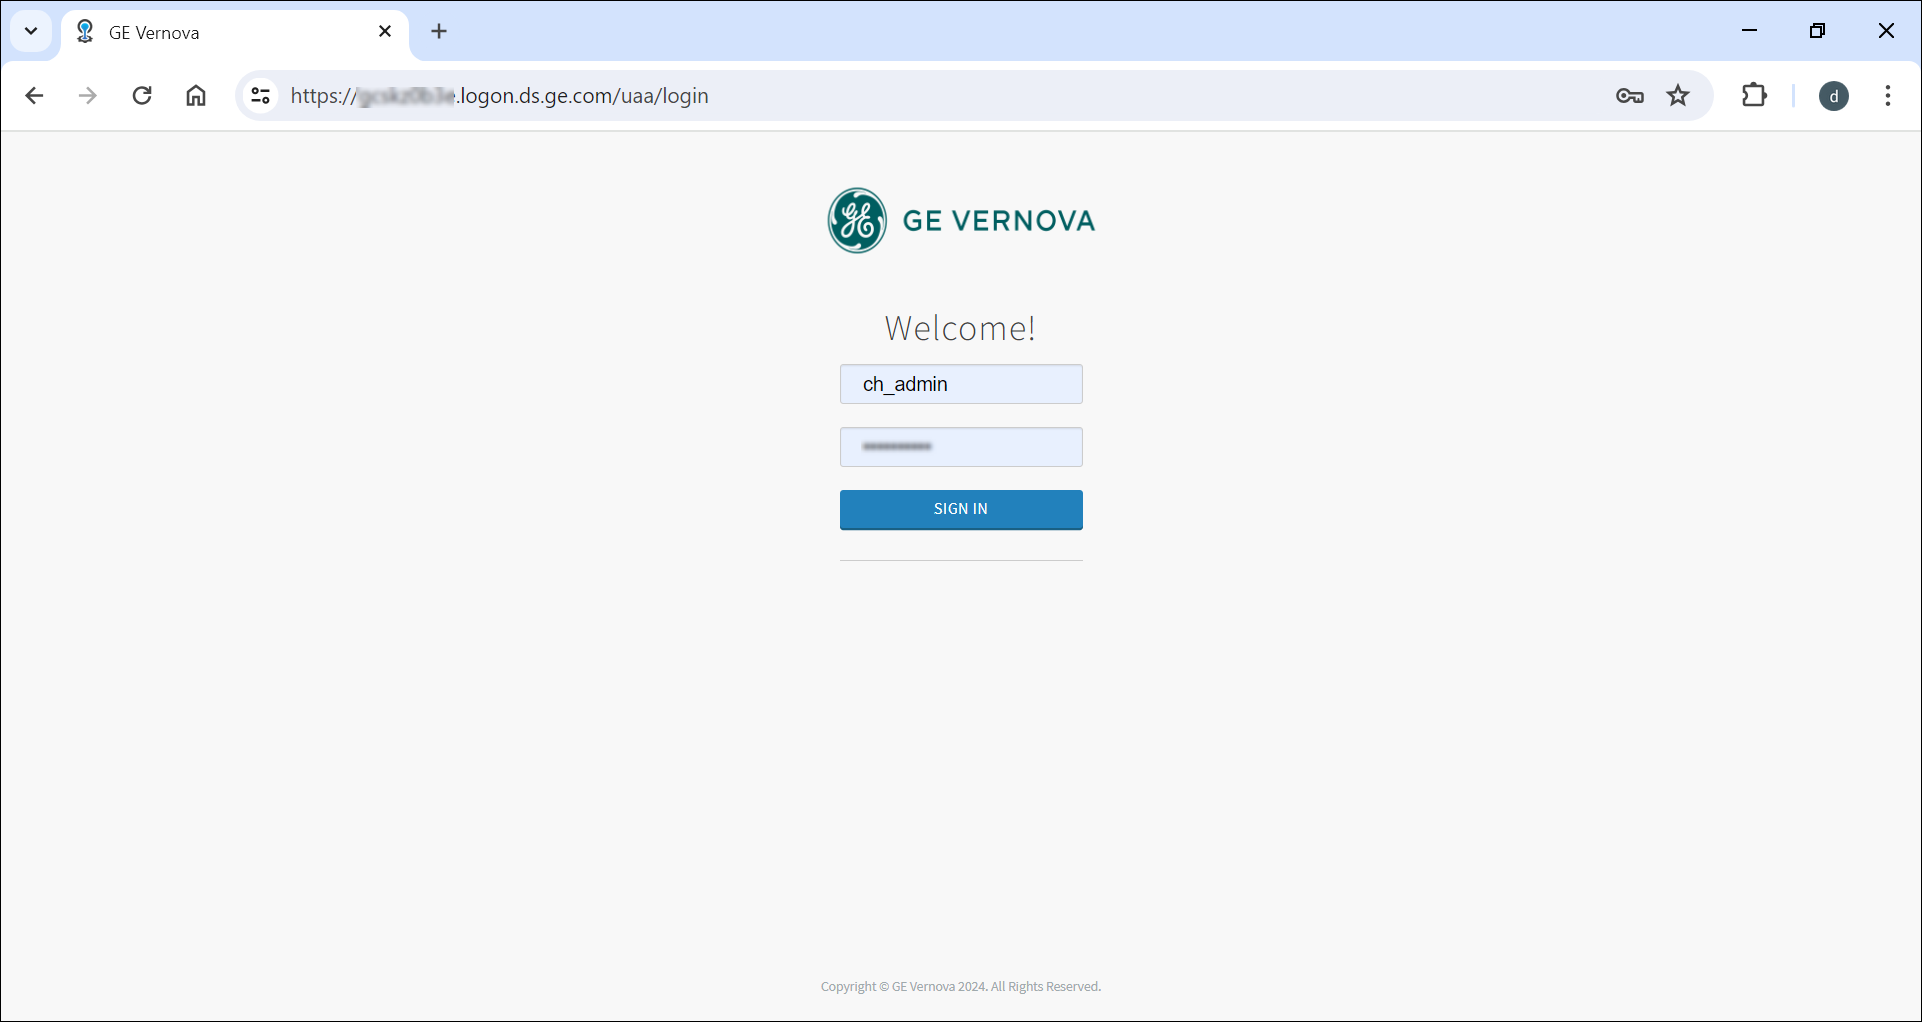
-
Enter the following credentials, and then click SIGN
IN.
- User Identifier: The default user id for first time users; that is, ch_admin.
- Password: The password you entered in the Client Secret field in the Proficy Authentication section of the Node Manager Configuration window.
The Configuration Hub user interface appears.Note: After you log in to Configuration Hub, in Proficy Authentication, include the groups as required. Only an administrator with admin rights in Security-Proficy Authentication can provide user permissions to the groups. Refer to the Proficy Authentication documentation for more information on granting permissions to Groups and Users. -
In the NAVIGATION panel, click
 Administration.
The Node Manager and License Server panels will appear.
Administration.
The Node Manager and License Server panels will appear. -
Click Node Manager.
The Node Manager-Administration panel appears displaying the Configuration Hub and Proficy Authentication product details.
-
Click
 to add the Node Manager.
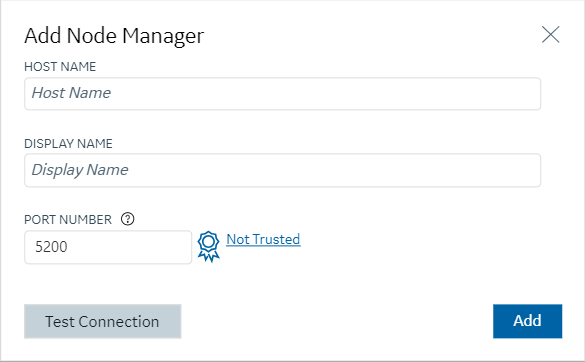 The Add Node Manager window appears. Enter the following details:
- HOST NAME: The name of the node server where the product is installed. In the <Fully Qualified Domain Name> format.
- DISPLAY NAME: The display name is automatically populated, reflecting the host name field. You can choose to edit the display name as needed.
- PORT NUMBER: The node manager port number where the product is
installed.Note: The HOST NAME and PORT NUMBER details, as populated in the Node Manager Configuration window under the Node Manager details on this host section, must match the same details. Refer to Step 13.
Note: If the root certificate of the Node Manager is not trusted, then click not trusted, the
Certificate Details page appears. Click
Trust to trust the root certificate.The root certificate is trusted
. -
Click Add.
The Node Manager added successfully message appears.
-
In the grid-view, select the Node Manager row and confirm that the information in
the DETAILS panel for that selected node is correct.
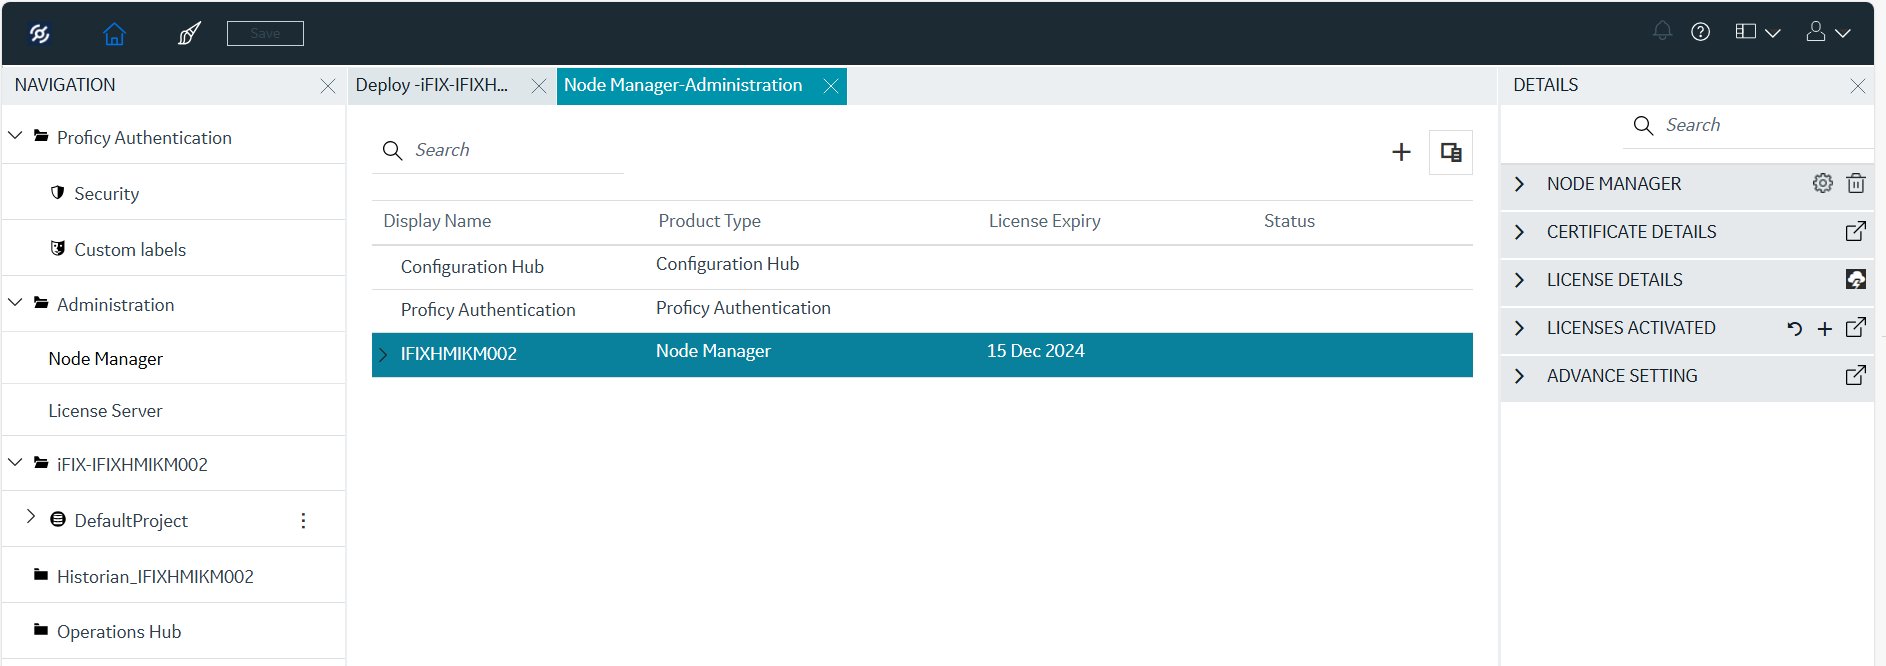
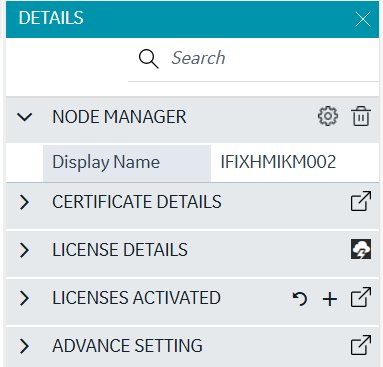
Within the DETAILS panel, you can perform the following actions in the Node Manager section:
- View or modify the node name. Click next to the NODE
MANAGERto modify the Display Name field.
 Note: You can modify the Node Manager display name only after adding the Node Manager.
 - View or manage plug-ins. Click the Manage
 button next to the NODE MANAGER text in the DETAILS
panel to open the Manage Plug-ins dialog box. The
installed products should all appear in this dialog box.
button next to the NODE MANAGER text in the DETAILS
panel to open the Manage Plug-ins dialog box. The
installed products should all appear in this dialog box.
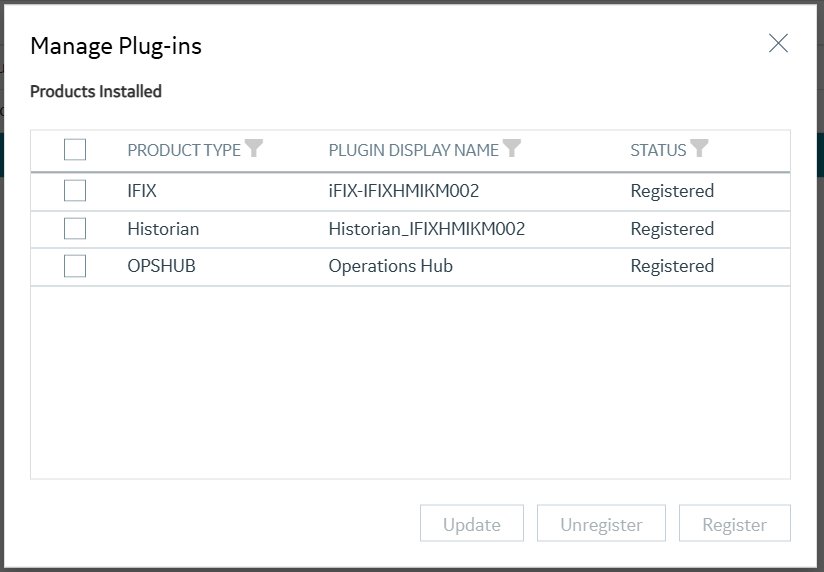
If you want to register or unregister a product with Configuration Hub, select the check box next to the product name, and then either select Register or Unregister. You can modify the plug-in display name from this dialog box as well. The NAVIGATION panel should update with your changes.
Note: You can also right-click on the Node Manager row in the grid and select Manage or Delete as needed to perform actions similar to those in the Node Manager section within the DETAILS panel. See the following figure for an example of the drop-down from the grid view.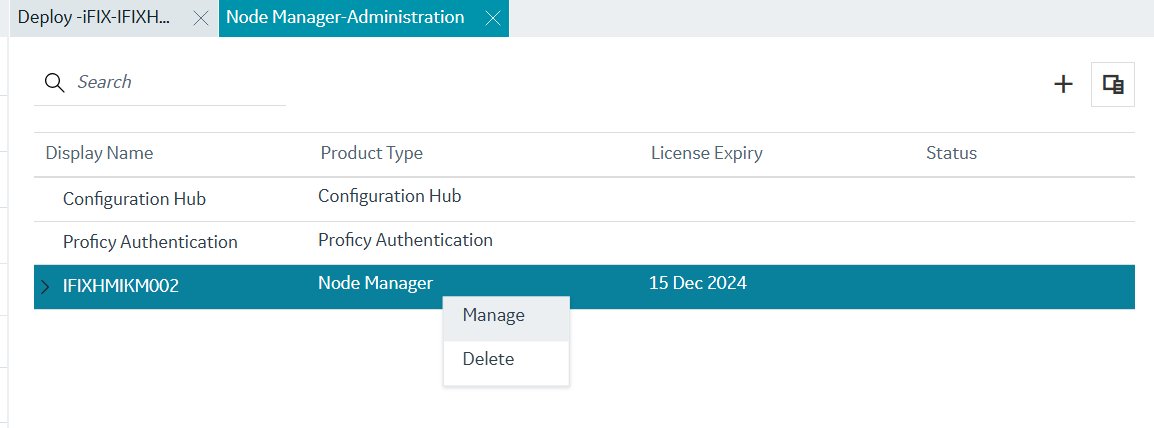
- View or modify the node name. Click
-
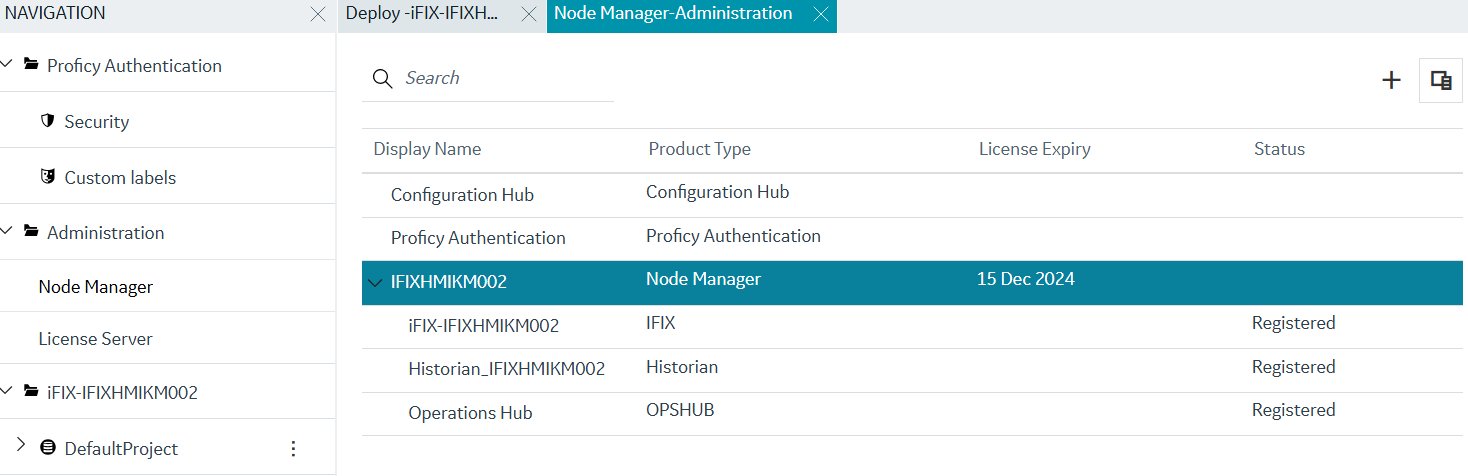
In the Node Manager, in grid view, click next to the node name to view
and confirm the list of installed products installed on that node. In the following
example, the selected node has iFIX, Historian, and Operations Hub installed.
-
Select a product, and in the Details pane click the next to the PLUG-IN
heading. The following figure shows the information you can edit from the DETAILS
panel for a product.
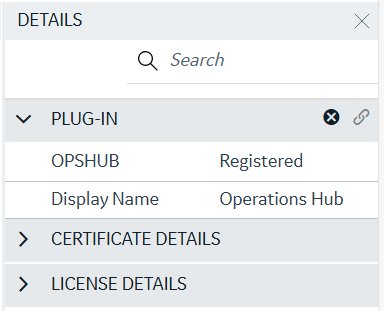
On the DETAILS panel for the Plug-in, you can:
- Modify the Display Name field.Note: You can modify the product plug-in display name only after registering the product.
- Register a product. Click the Register
 button.
 The Register Plug-in dialog box appears. The PLUGIN HOST, PRODUCT TYPE, and DISPLAY NAME fields are auto populated. Click Register to register the product with Configuration Hub.
The Plugin(s) Registered Successfully message appears, and the product plug-in is now listed in the NAVIGATION panel. - Unregister a product. Click the Unregister
 button.
 The Unregister Plug-in dialog box appears. If you click Continue to unregister the product, the product plug-in will be removed from the NAVIGATION panel. Also, any open panel belonging to this plug-in will be closed, and changes to the product plug-in will not be saved.
Note: You can also right-click on the product row and select Register or Unregister as needed to perform actions similar to those in the PLUG-IN section within the DETAILS panel.If you click Register, the Plugin(s) Registered Successfully message appears, and the product plug-in is now listed in the NAVIGATION panel.
- Modify the Display Name field.