
Install Time Registration for MQTT Client
If you choose to install MQTT Client using the Install Time Registration method, ensure that Configuration Hub and Proficy Authentication are installed before initiating MQTT Client installation. During the installation process, you will be prompted to provide both Configuration Hub and Proficy Authentication server details for MQTT Client registration with Configuration Hub and updating the product with Proficy Authentication. After a successful installation, the MQTT Client will automatically register with Configuration Hub and appear as a plugin in Configuration Hub.
Before you begin
Procedure
- From the Proficy install media, double-click the .iso file or select Mount from the context menu.
-
Double-click the Setup.bat file, which will launch the Proficy
installer.
For example, here with what the MQTT Client option that shows up on the iFIX install:
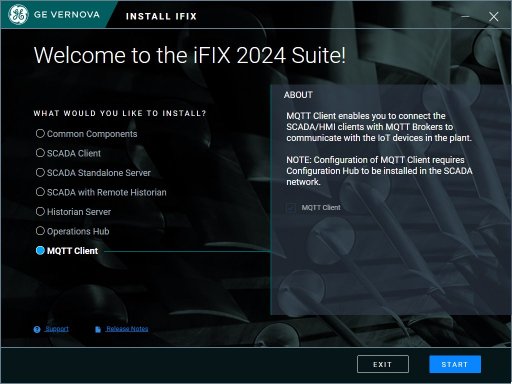 The welcome screen for the Proficy installer appears.
 - Select MQTT Client, and then click START.
- Select ACCEPT to proceed with the License Agreement.
-
Select NEXT to install the MQTT Client product in the
default location <Install_location>\Proficy or click
 to modify the install location.
-
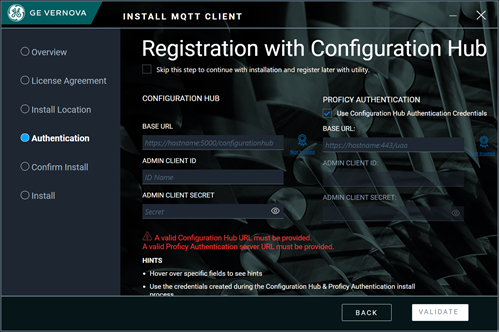
In the Registration with Configuration Hub screen, enter the
Configuration Hub and Proficy Authentication server details.
-
In the Configuration Hub section, enter the following details:
Field Description BASE URL Enter a valid base URL in the following format https://hostname:<port number>/configurationhub
- hostname: The name of the Configuration Hub server to which you want to register. In the <Fully Qualified Domain Name> format.
- <port number>: The port number of the Configuration Hub server to which you want to register.
Note:- Do not enter a slash at the end of the base URL.
- If the base URL indicates
 Not trusted, it means there is no trust
established with the host, or the root certificate of
Configuration Hub server is incorrect. You must verify the base
URL and enter a valid URL to establish the trust
Not trusted, it means there is no trust
established with the host, or the root certificate of
Configuration Hub server is incorrect. You must verify the base
URL and enter a valid URL to establish the trust  with the host and with the correct
root certificate details.
with the host and with the correct
root certificate details.
ADMIN CLIENT ID The admin client ID of the Configuration Hub server that you provided during the Configuration Hub installation. ADMIN CLIENT SECRET The admin client secret of the Configuration Hub server that you provided during the Configuration Hub installation. -
In the Proficy Authentication section, enter the following details:
Field Description Use Configuration Hub Authentication Credentials Select this check box if you entered the same credentials (Admin Client ID and Admin Client Secret) for both Configuration Hub and Proficy Authentication during installation. BASE URL Enter a valid base URL in the following format https://hostname:<port number>/uaa
- hostname: The name of the Configuration Hub server to which you want to register. In the <Fully Qualified Domain Name> format.
- <port number>: The port number of the Proficy Authentication server to which you want to register.
Note:- Do not enter a slash at the end of the base URL.
- If the base URL indicates
Not trusted, it means there is no trust
established with the host, or the root certificate of Proficy
Authentication server is incorrect. You must verify the base URL
and enter a valid URL to establish the trust with the host and with the correct
root certificate details.
ADMIN CLIENT ID The admin client ID of the Proficy Authentication server. ADMIN CLIENT SECRET The admin client secret of the Proficy Authentication server. Note:- You must enter valid Configuration Hub and Proficy Authentication server URL details, and also valid port numbers to establish the host connection.
- You must enter the credentials (Admin Client ID and Admin Client Secret) that were created during Configuration Hub and Proficy Authentication installation process.
-
Select VALIDATE.
Note:
- The validate button will be enabled only if you enter all the mandatory fields and trust the root certificate.
- If the entered details are incorrect, the validation fails, and the Validate button will not be enabled. You cannot proceed further with the installation of MQTT Client until you enter the correct details in the fields.
-
Select START in the Confirm Install
screen to start the MQTT Client installation.
The MQTT Client is installed in the <install location\Program Files\Proficy>.Note: During the MQTT Client installation, the License Client will also be installed silently.
- Select CLOSE.
- After successfully installing the MQTT Client product, you must restart your machine for the proper functioning of the MQTT Client software. Select REBOOT NOW to restart your machine.
- Ensure that you set up Proficy Authentication in Configuration Hub. Refer to Set up Proficy Authentication for more details.
-
Double-click the
 Configuration Hub desktop shortcut.
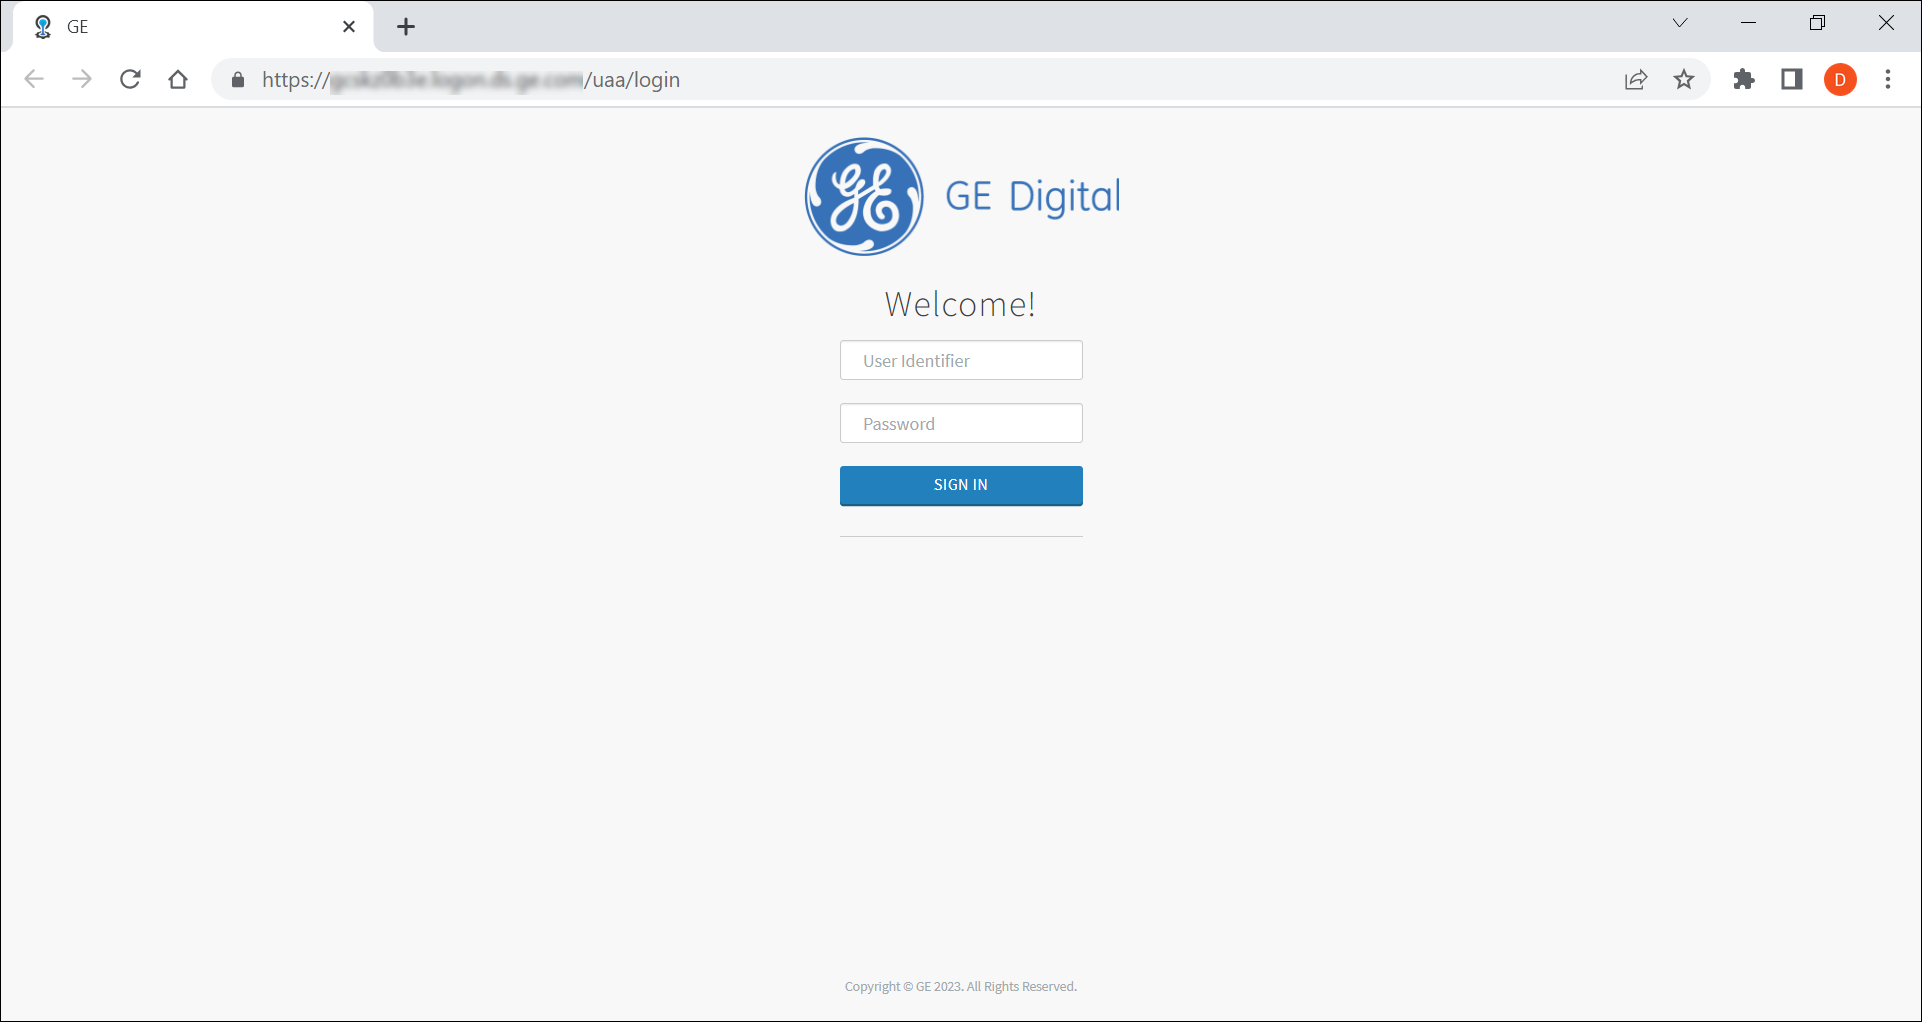
-
Enter the following credentials, and then select SIGN
IN.
- User Identifier: The default user id for first time users, that is, ch_admin.
- Password: The password you entered in Admin Client Secret field during Plug-in Registration Details at Step 7.
The Configuration Hub user interface appears, and the MQTT Client product, registered with Configuration Hub, automatically appears in the NAVIGATION panel as MQTT Client.Note: In the NAVIGATION panel, in Proficy Authentication, include the groups as required. Only the administrator with admin rights in Security-Proficy Authentication can provide user permissions to the groups. Refer to the Proficy Authentication help documentation for more details on managing Groups and Users to have access permissions.
-
In the NAVIGATION panel, select
 Administration plugin.
The Node Manager and License Server panels will appear.
Administration plugin.
The Node Manager and License Server panels will appear. -
Select Node Manager.
The Node Manager-Administration panel appears, displaying the Configuration Hub and Proficy Authentication product details. Additionally, the Node Manager row is automatically added to the panel, when you install the MQTT Client product using the Install Time Registration method.
-
If the Node Manager row unexpectedly fails to appear in the Node
Manager-Administration panel, then you must perform the following steps
to add the Node Manager to the panel; otherwise, continue with Step 20.
-
Select
 to add the Node Manager.
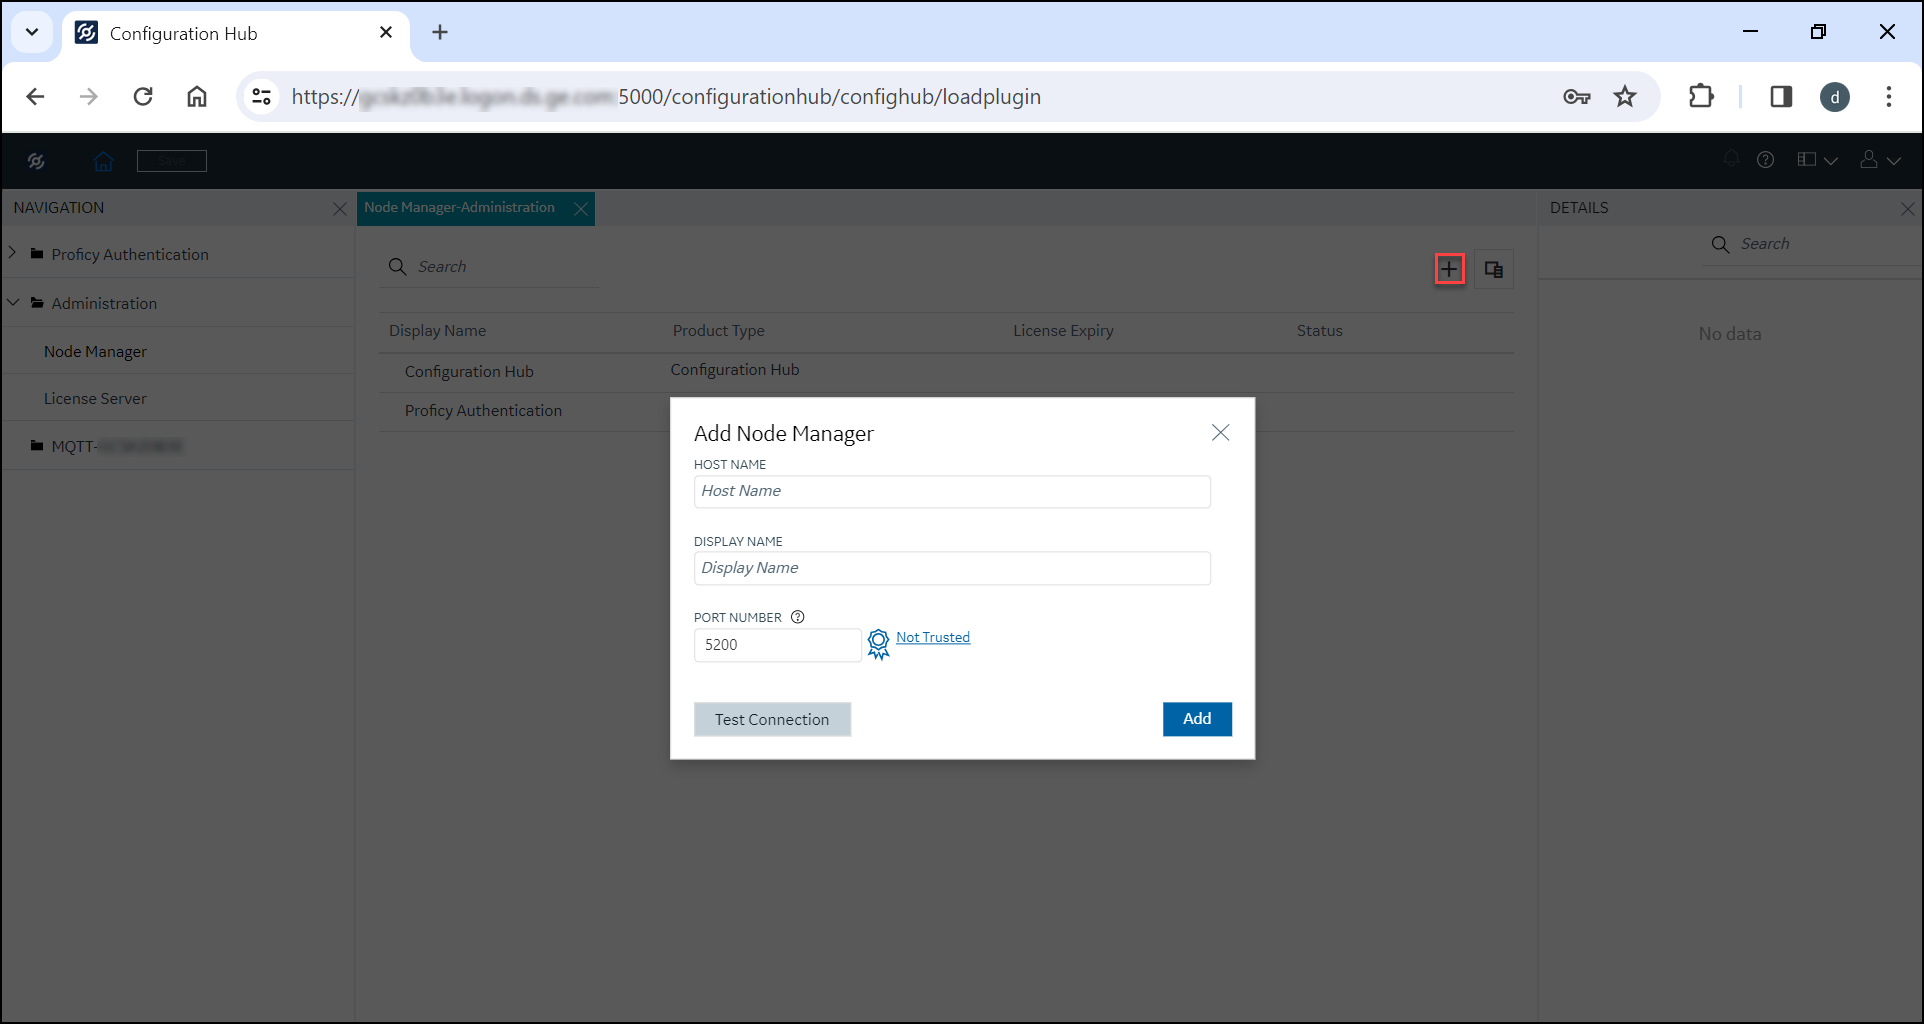 The Add Node Manager window appears. Enter the following details:
- HOST NAME: The name of the node server where the MQTT Client is installed. In the <Fully Qualified Domain Name> format.
- DISPLAY NAME: The display name is automatically populated, reflecting the host name field. You can choose to edit the display name as needed.
- PORT NUMBER: The node manager port number where the MQTT Client is installed.
Note: If the root certificate of the Node Manager is not trusted, then click not trusted , the Certificate Details page appears. Select
Trust to trust the root certificate.
, the Certificate Details page appears. Select
Trust to trust the root certificate.The root certificate is trusted
.
-
Select
-
Select of the Node Manager row.
The list of Proficy product(s) installed on the node appears. Select the MQTT Client product row, the DETAILS panel display the MQTT Client product details. You can perform the following actions:
- PLUG-IN: Select of the
PLUG-IN and, if required, edit the Display Name field to update the
MQTT Client product plugin display name.
- Select the Unregister
 button.
The Unregister Plug-in window appears. If you select Continue to unregister the MQTT Client, the MQTT Client plugin will be removed from the NAVIGATION panel. Also, any open panel belonging to this MQTT Client plugin will be closed, and changes to the MQTT Client plugin will not be saved.
Note: You can modify the MQTT Client product plugin display name only after registering the MQTT Client with Configuration Hub. - Select the Register
 button.
The Register Plug-in window appears. The PLUGIN HOST, PRODUCT TYPE, and DISPLAY NAME fields are auto populated. Select Register to register the MQTT Client with Configuration Hub.
The MQTT Client Registered Successfully message appears, and the MQTT Client product plugin is now listed in the NAVIGATION panel.You can now enable your HMI/SCADA OPC UA clients to communicate with IoT devices and MQTT brokers by using MQTT Client.
Note: You can also right-click on the MQTT Client product row and select Unregister or Register as needed to perform actions similar to those in the PLUG-IN section within the DETAILS panel.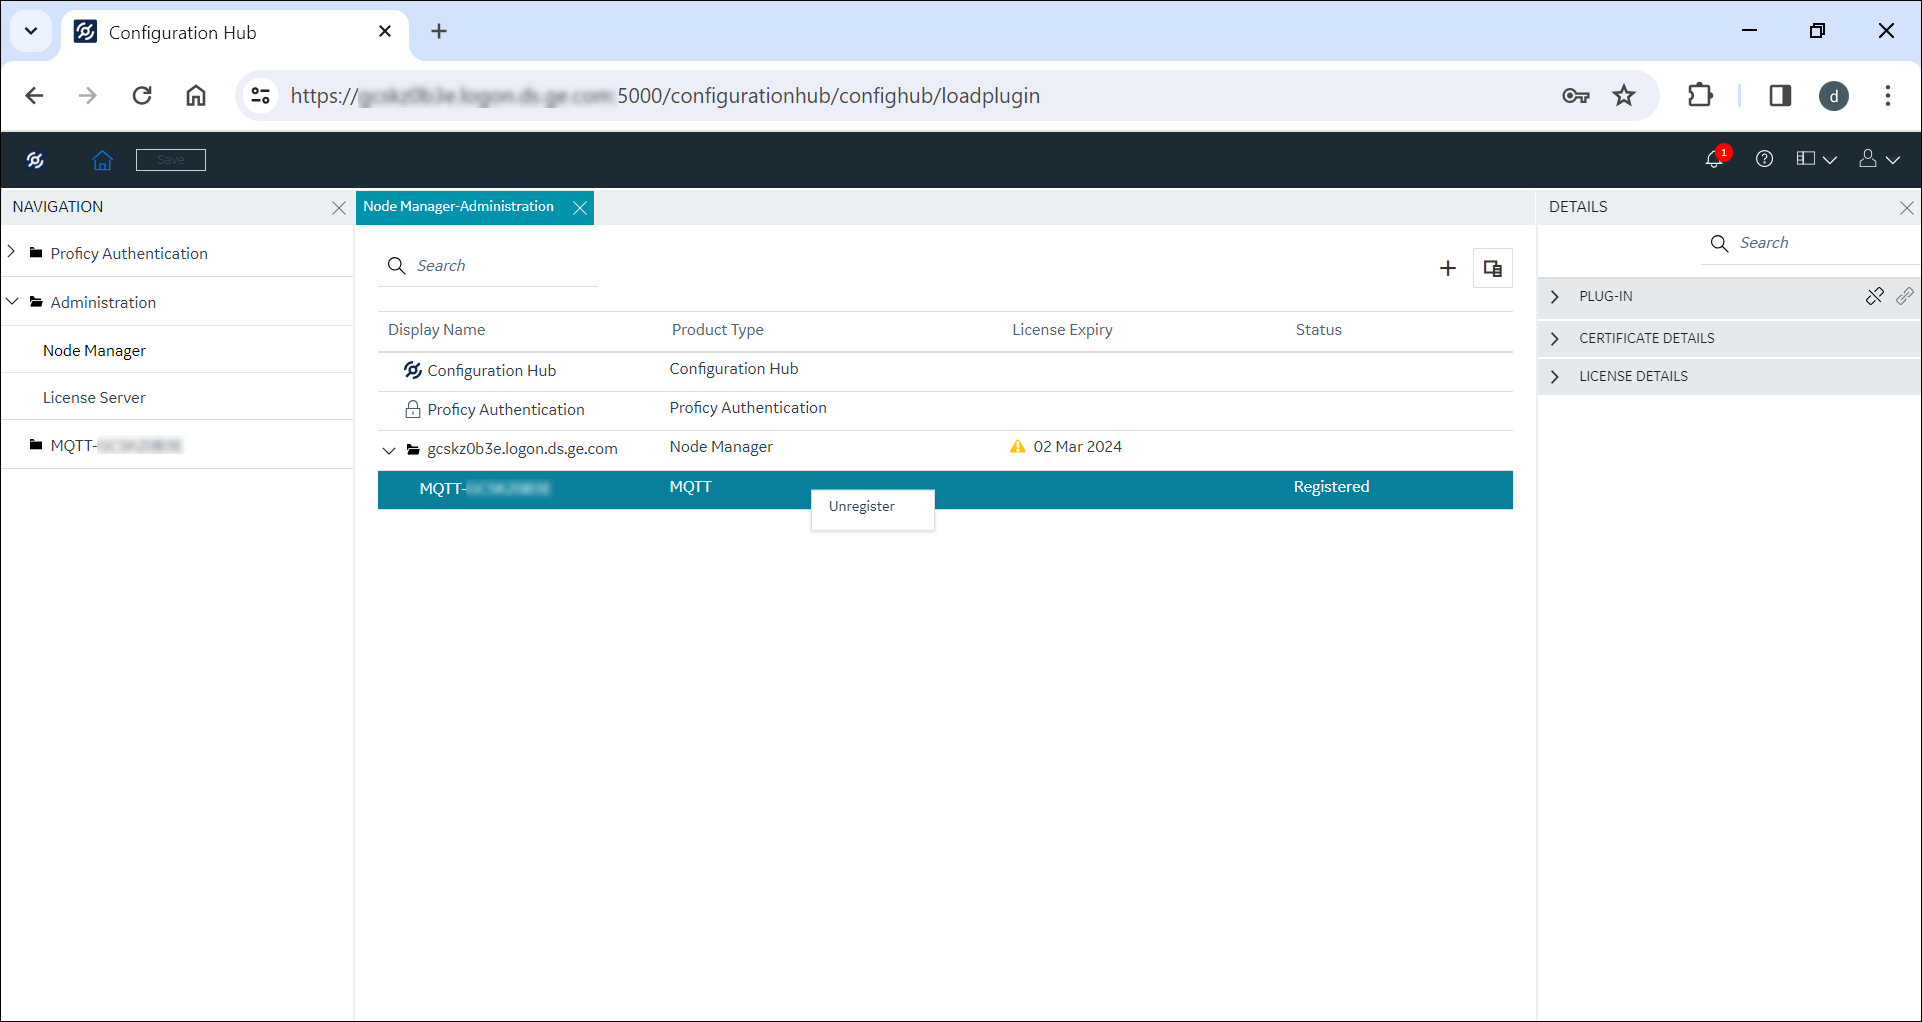
- Select the Unregister
- PLUG-IN: Select
-
If you are not licensed to use the MQTT Client, the MQTT Client will run in Demo
mode for two hours, after which the following message will be displayed in the
Configuration Hub user interface.
Demo license expired. Restart the MQTTClient service.
When you try to load the MQTT plugin connection, the following error message will be displayed.Service unavailable. Restart the MqttClient service.
Perform the following steps to start the MQTT Client Service:- Right-click the Windows Start menu, and then click Computer Management.
- Click Services and Applications and then, double-click
 Services.
 - Click GE MQTT Client Service and click Start to start the GE MQTT Client Service.
After starting the GE MQTT Client Service, when you select the MQTT Client plugin in Configuration Hub, the Connections-<MQTT plugin name> panel will display the Demo license expiry time.
Important: If you run the MQTT Client in Demo license mode, OPC UA write permissions are not supported. As a result, the OPC UA clients can only read the values of OPCUA tags but cannot write to or modify them.