Upgrade the Plant Applications Web Client Without Using Docker
Before you begin
- Ensure that you complete the following procedure specific to the Plant Applications Message Bridge:
- Uninstall the earlier version of the Plant Applications Message Bridge.
The Proficy Server Message Bridge service is disabled.
- Delete the directory - C:\Program Files (x86)\Proficy\Proficy Server\RabbitMQMessageBridgeService.
- Restart your computer.
- Install the version of the Plant Applications Message Bridge included in the Plant Applications installer.
- Restart the Proficy Server Manager service.
The Proficy Server Message Bridge service is automatically restarted.
- Uninstall the earlier version of the Plant Applications Message Bridge.
- Ensure that you create a backup copy of the text file that includes the user-specific settings. The file is created in the directory <tomcat_home>/Apache Software Foundation/Tomcat 9.0/users/<user>, where:
- <tomcat_home> is the directory where you installed Apache Tomcat. For example, C:/Program Files.
- <user> is the name of a logged-in user.
About this task
Note: The Plant Applications 8.1 installer is the base installer for all upgrade requirements.
Procedure
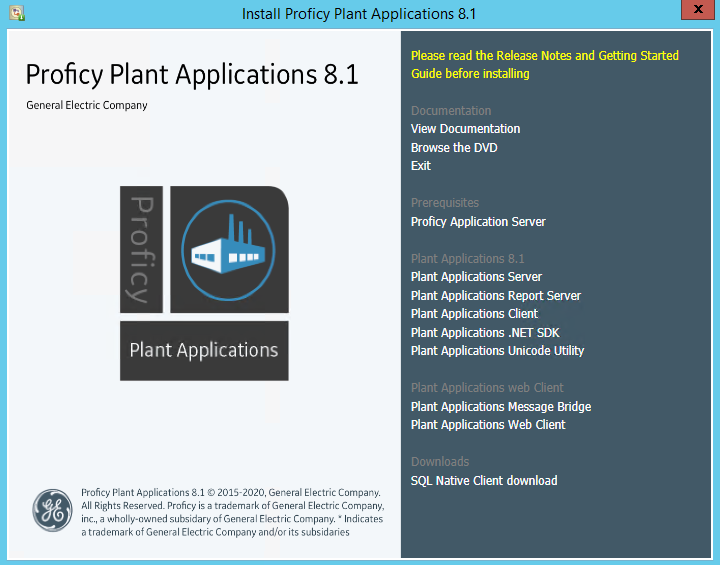
- Run the installfrontend.exe file as an Administrator.The installation menu appears, displaying the Install Proficy Plant Applications 8.1 screen.
 Tip: You can hover over each task that appears in the installation menu to refer to the tooltip associated with that task.
 - Select Plant Applications Web Client.The installer gathers the current configuration and determines the required configurations that need to be updated.
Then the upgrade wizard appears, displaying the Welcome to Plant Applications Web Client screen.
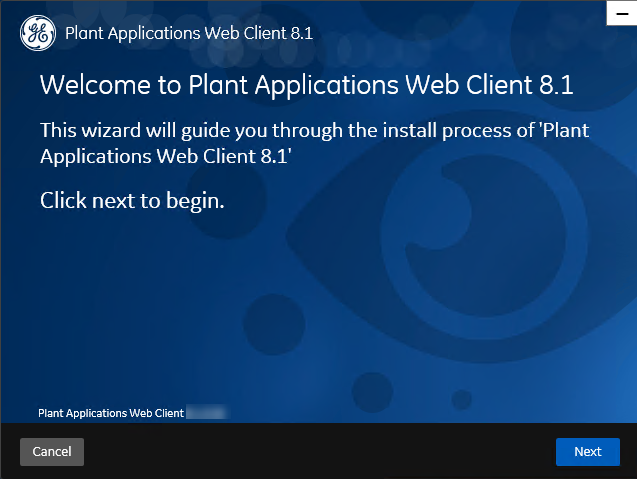
- In the Welcome to Plant Applications Web Client 8.1 screen, select Next.The Read and accept the license agreement to continue screen appears.
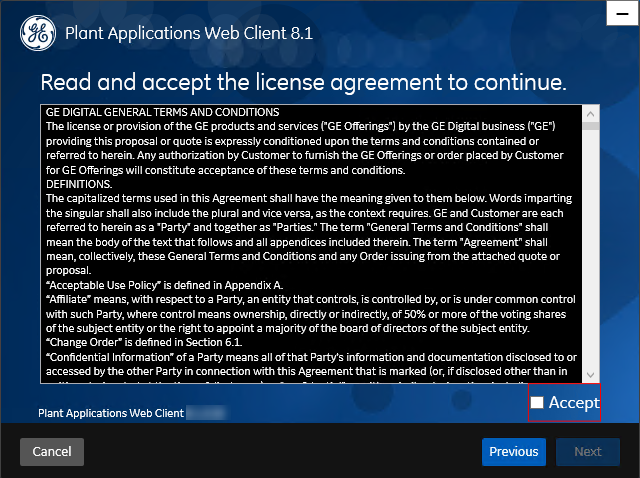
- Read the license agreement, select Accept, and then select Next to continue the installation.The Prerequisites screen appears.
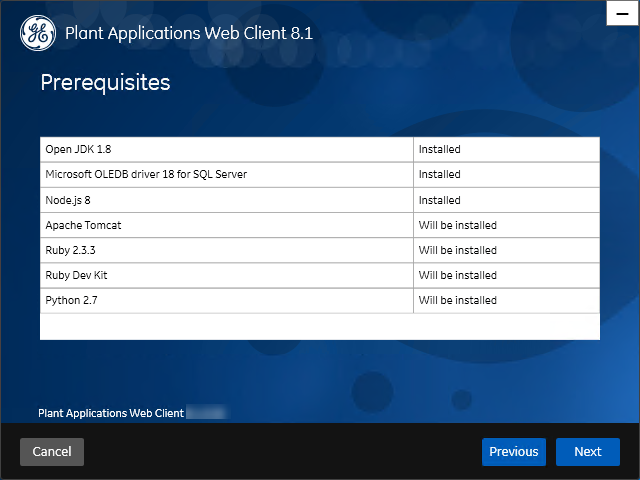
- In the Prerequisites screen, select Next to view all installed prerequisites and install any missing prerequisites.The Operations Hub Credentials screen appears.
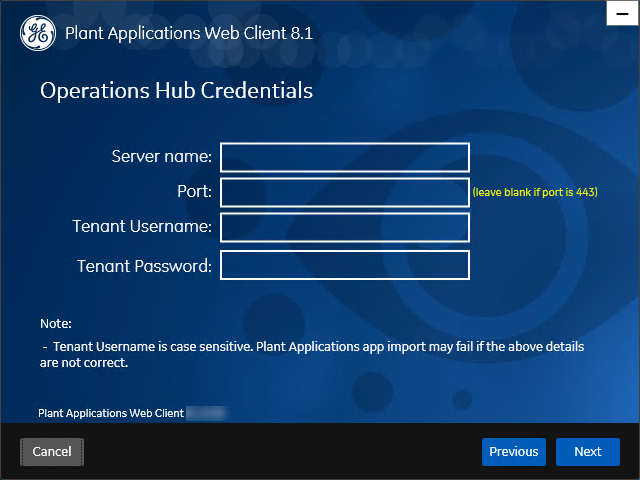
- Select Next to continue with the installation.The Install Model Selection screen appears.
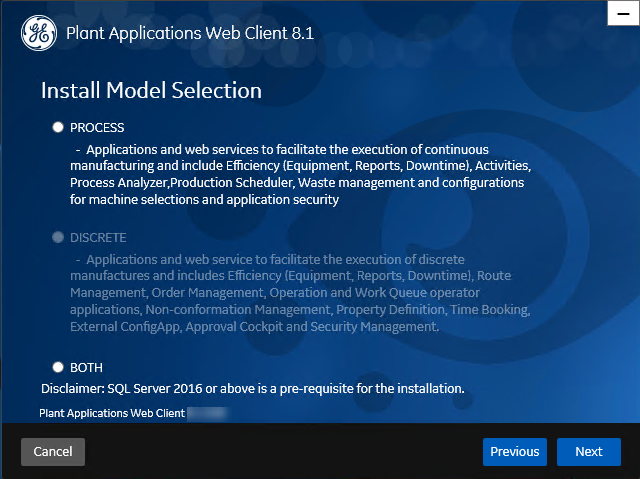
- Select Next.The Historian UAA Credentials screen appears.
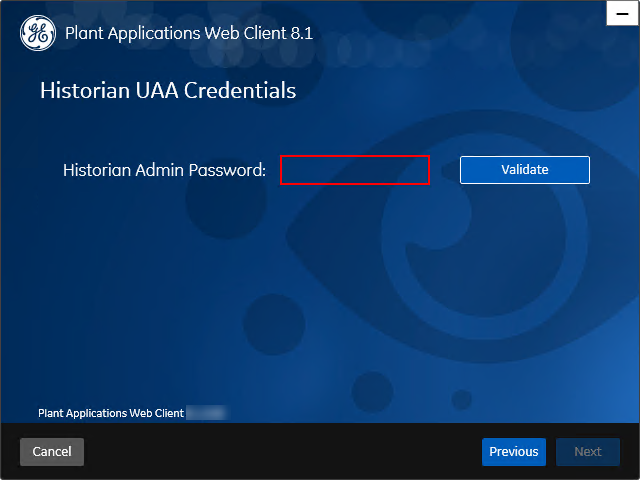
- In the Historian UAA Credentials screen, enter the password to access the Historian UAA server and then select Validate.The following table describes each icon indicating a validation status that might appear during the validation process.
If the Historian UAA server connection is successfully validated, the Next button is enabled.Icon Description 
Indicates that the validation is in progress. 
Indicates that the validation was successful. 
Indicates that the validation was unsuccessful. In this case, make sure you enter the correct password. - Select Next.The UAA Credentials screen appears.
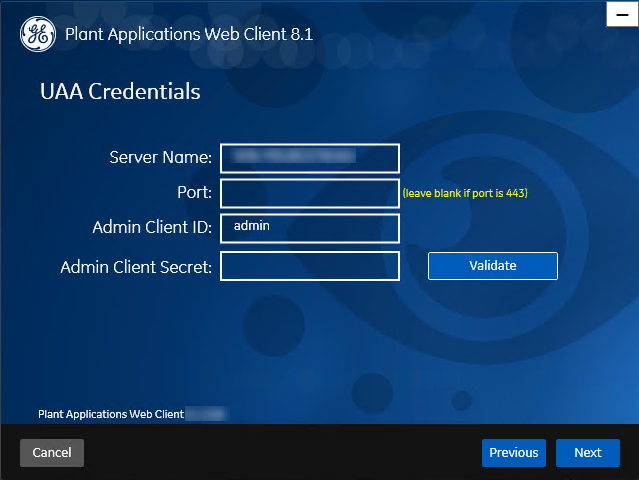
- In the UAA Credentials screen, enter the credentials to access the UAA server as described in the following table.
Credential Description Server Name Enter the host name of the UAA server. Note: Instead of IP address, it is recommended to use the UAA host name (computer name).Port Enter the UAA port number. Admin Client ID Enter the admin Client ID to access the UAA server instance. Note: The default user name isadmin.Admin Client Secret Enter the Client Secret for the user name you entered in the Admin Client ID box. Validate Select Validate to validate the UAA server connection. Note: The following table describes each icon indicating a validation status that might appear during the validation process.Icon Description Indicates that the validation is in progress. Indicates that the validation was successful. Indicates that the validation was unsuccessful. In this case, make sure you enter the correct password. If all the options are entered correctly, the Next button is enabled. - Select Next.
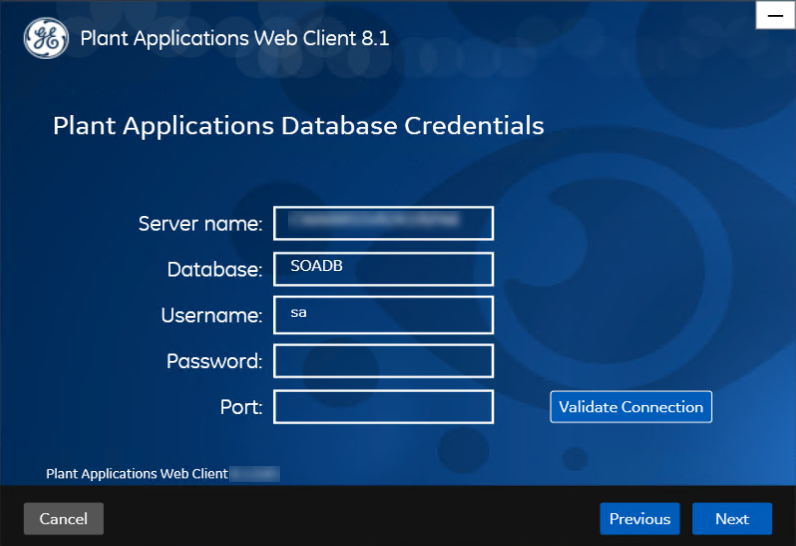
The Plant Applications Database Credentials screen appears.
 Note: If you have selected BOTH in the Install Model Selection screen, the following screen appears that allows you to enter the Couch DB details.
- Select Validate Connection to validate the database connection.Note: The validation process takes some time to check whether a compatible version of the Plant Applications server is installed.The following table describes each icon indicating a validation status that might appear during the validation process.
If you have selected PROCESS in the Install Model Selection screen and the database connection is successfully validated, the Next button is enabled. Skip to Step 19.Icon Description Indicates that the validation is in progress. Indicates that the validation was successful. Indicates that the validation was unsuccessful. In this case, make sure you enter the correct password. - If you have selected BOTH in the Install Model Selection screen, in the Plant Applications Database Credentials screen, select the CouchDB tab.The Document Service Couch DB Credentials screen appears.
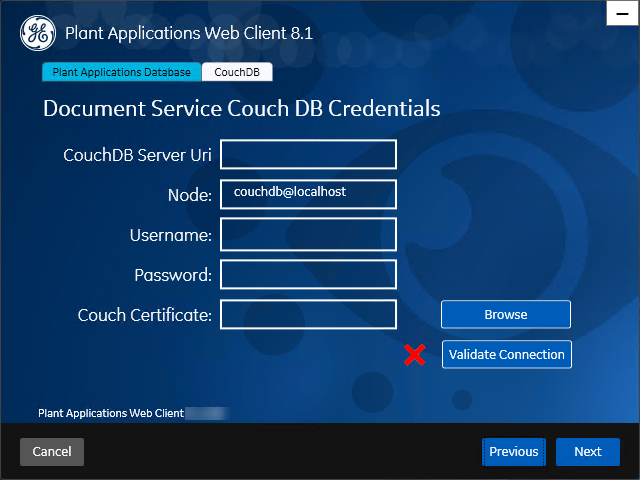
- In the Document Service Couch DB Credentials screen, enter the Couch DB credentials as described in the following table.
Credential Description CouchDB Server Uri Enter the fully qualified web address of Apache CouchDB in the format: https://<host name or IPaddress>:<port number>.Node Enter the name of the node where Apache CouchDB is running. By default, the node value appears. Username Enter the user name of the administrator that has permissions to access the database you entered in the Database box. Password Enter the password for the user name you entered in the Username box. Couch Certificate Select Browse to locate the Apache CouchDB server certificate (couch_server.crt) that you have generated and upload it. Validate Select Validate to validate the Apache CouchDB database credentials. Note: The following table describes each icon indicating a validation status that might appear during the validation process.Icon Description Indicates that the validation is in progress. Indicates that the validation was successful. Indicates that the validation was unsuccessful. In this case, make sure you enter the correct password. If the Apache CouchDB database connection is successfully validated, the Next button is enabled. - Select Next.The Plant Applications Administrator User Credentials screen appears.

- In the Plant Applications Administrator User Credentials screen, enter the Plant Applications Administrator credentials as described in the following table.Note: Ensure that the user credentials entered here must exist in Plant Applications Server with an administrator role defined and you must use the same credentials to login into the Web Client applications.
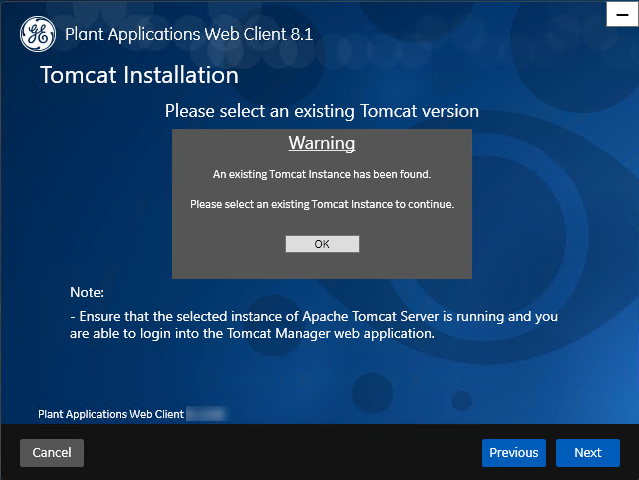
Credential Description User Name Enter the user name for an administrator account in Plant Applications. Note: The default user name isOphubAdmin.Password Enter the password for the user name you entered in the User Name box. Validate Select Validate to validate the Plant Applications Administrator credentials. Note: The following table describes each icon indicating a validation status that might appear during the validation process.Icon Description Indicates that the validation is in progress. Indicates that the validation was successful. Indicates that the validation was unsuccessful. In this case, make sure you enter the correct password. If the Plant Applications Administrator connection is successfully validated, the Next button is enabled. - Select Next.The Tomcat Installation screen appears.Note: If you already have a Tomcat instance running, a message stating that the Tomcat instance has been found appears in the Tomcat Installation screen informing you to select the existing Tomcat instance.
- Select Next.The RabbitMQ Credentials screen appears.
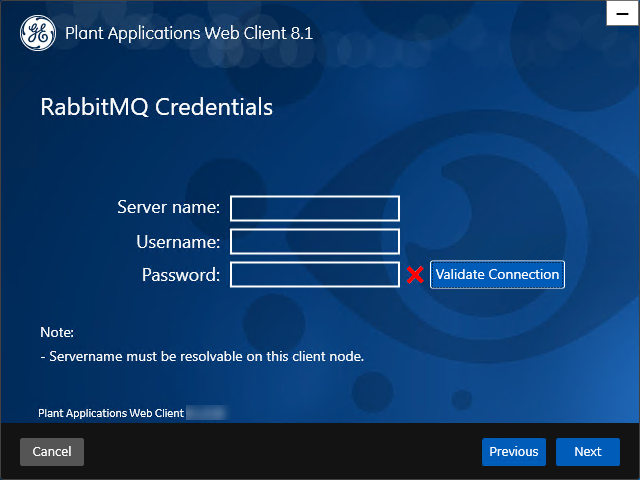
- In the RabbitMQ Credentials screen, perform one of the following steps:
- Enter the RabbitMQ credentials for the machine that hosts your Plant Applications message bridge as described in the following table, and then select Validate Connection.
Credential Description Server name Enter the computer name or IP address that hosts your Plant Applications Message Bridge. Username Enter the Administrator's user name that you set during Plant Applications Message Bridge installation. Password Enter the password for the Administrator's user name you entered in the Username box. The following table describes each icon indicating a validation status that might appear during the validation process.Icon Description Indicates that the validation is in progress. Indicates that the validation was successful. Indicates that the validation was unsuccessful. In this case, make sure you enter the correct password.
- Enter the RabbitMQ credentials for the machine that hosts your Plant Applications message bridge as described in the following table, and then select Validate Connection.
- Select Next.The Kafka Credentials screen appears.
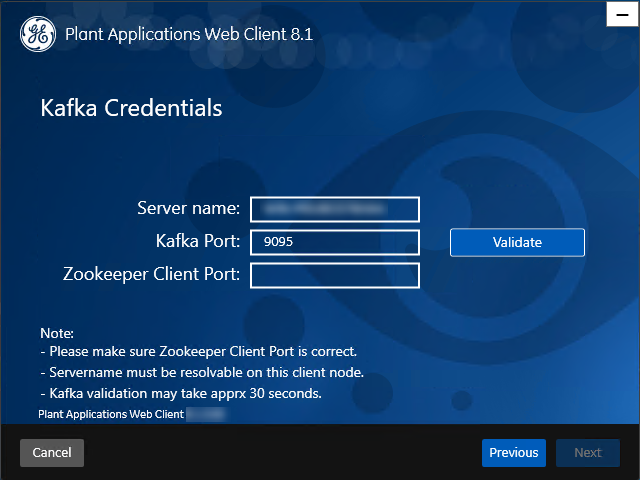
- In the Kafka Credentials screen, enter the credentials to access the Kafka server as described in the following table.
Credential Description Server Name Enter the host name of the Kafka server. Note: Instead of IP address, it is recommended to use the Kafka host name (computer name).Kafka Port Enter the Kafka port number. Zookeeper Client Port Enter the Zookeeper Client port number. Validate Select Validate to validate the Kafka server connection. Note: The following table describes each icon indicating a validation status that might appear during the validation process.Icon Description Indicates that the validation is in progress. Indicates that the validation was successful. Indicates that the validation was unsuccessful. In this case, make sure you enter the correct password. If all the options are entered correctly, the Next button is enabled. - Select Next.The You are ready to upgrade screen appears.
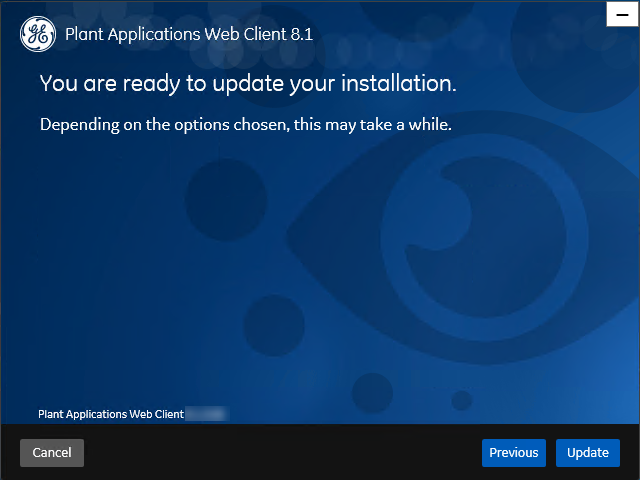
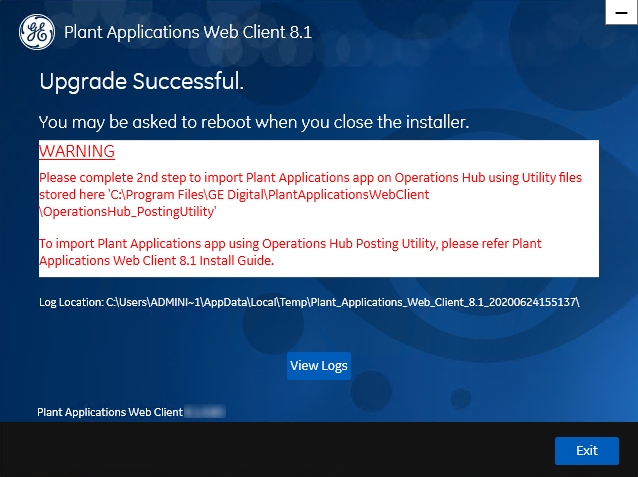
- Select Upgrade, and then wait for the upgrade process to complete. Depending on the contents to be upgraded, the upgrade process might take some time. A message appears in the wizard, indicating whether the upgrade was successful or not.