Installing Historian with LDAP Integration

About this task

Before installing Historian with LDAP integration, make sure you have an LDAP server set up. For Historian, this is a Windows domain controller or an Active Directory server.

On your domain (or Active Directory), create users and groups as usual. In order for Historians User Authentication and Authorization server to log users in, you also need to identify an attribute in your LDAP schema that can be used as the user name in Historian. This attribute needs to be able to uniquely identify each user. In addition, as Historian user names cannot contain space, values of this attribute should not contain space either. Typically, sAMAccountName or userPrincipalName meet these conditions in an LDAP directory backed by Windows Active Directory. By default, the sAMAccountName is used in the Search Filter, but this can be modified during your Historian installation.

Procedure

  1. Log in to the Windows Server as an administrator.
  2. Start the Historian installation by double-clicking the InstallLauncher.exe file.
    This file is found on your ISO or DVD.
  3. Click the Install Historian link to start the Historian installation.
    The Historian Welcome splash screen appears.
  4. Click Next.
    The End User License Agreement appears.
  5. Read the license agreement and check Accept.
  6. Click Next.
    The Where do you want to install Historian? prompt appears.
  7. To install on the default disk C:\, click Next.
    The Override the default Historian data path screen appears.
  8. Click Next to use the default path.
    The default Historian Data Path is C:\Proficy Historian Data.
  9. On the Choose the type of install you want to perform screen, select Single Server and click Next.
    The Choose a Password for Built-in Admin account screen appears.
  10. Enter the Admin Password and the re-enter the password in the second field to confirm, and then click Next.
    Note: The Password must be at least 6 characters, contain at least 2 numeric characters (0-9), and at least 3 alphabetic characters (a-z, A-Z).

    The LDAP server as the identity provider screen appears.

  11. Select Yes and click Next.
    The Provide the URL for the LDAP server screen appears.
  12. Type the URL in the LDAP Server URL text box
    The URL should begin with ldap:// or ldaps://.
    Note: Be sure to append the port number (configured for your LDAP protocol) to the IP address (for example, ldap://192.168.0.1:389,ldaps://192.168.0.1:636).
  13. Click Next.
    The Please enter details for search and bind authentication screen appears.


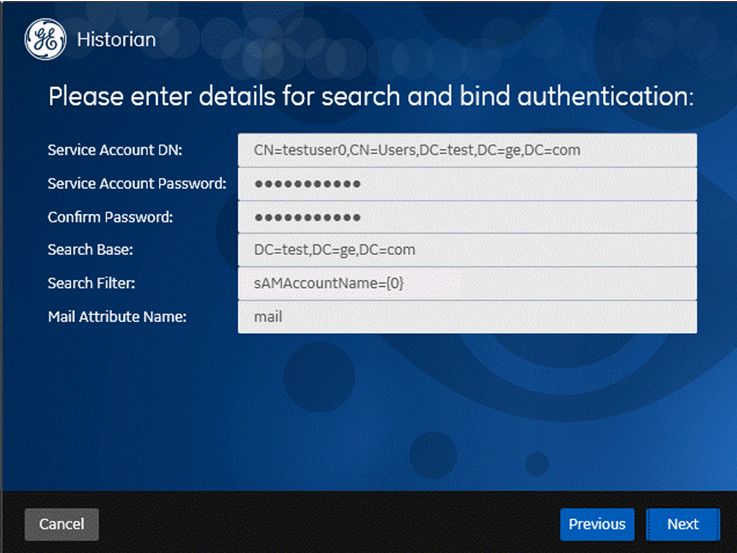
    Search and Bind means to search for users with a filter, typically "sAMAccountName={0}" for Windows Active Directory. Note that the default value for Search Filter is set to "sAMAccountName={0}" and "Mail Attribute Name" defaults to "mail", which you can leave as is. As an alternative to sAMAccountName, you may choose to use userPrincipalName instead.

  14. Type the appropriate entries in the Service Account DN, Service Account Password, Confirm Password, and Search Base text fields, and click Next.
    The Specify Distinguished Names of LDAP Groups mapped to each UAA scope screen appears.


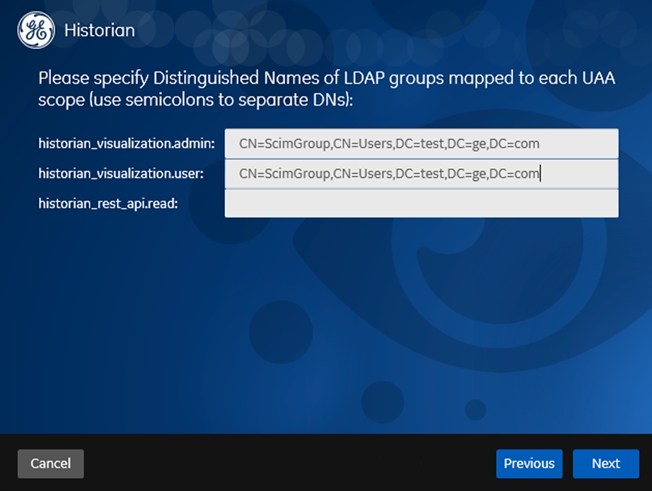
    In this screen, you configure how LDAP groups are mapped to three UAA scopes that you create. You can use tools such as ADExplorer from Microsoft to find out the full DN of a group. You can assign a scope to multiple LDAP groups; enter them together, separately by semicolon, in the field corresponding to the scope. If you leave any of them blank, it means that you are not associating any LDAP groups to the corresponding scope.

  15. Type the appropriate entries in the historian_visualization.admin, historian_visualization.user, and historian_rest_api.read scope fields and click Next.
    The Specify how searches for users' LDAP group membership should be conducted screen appears.


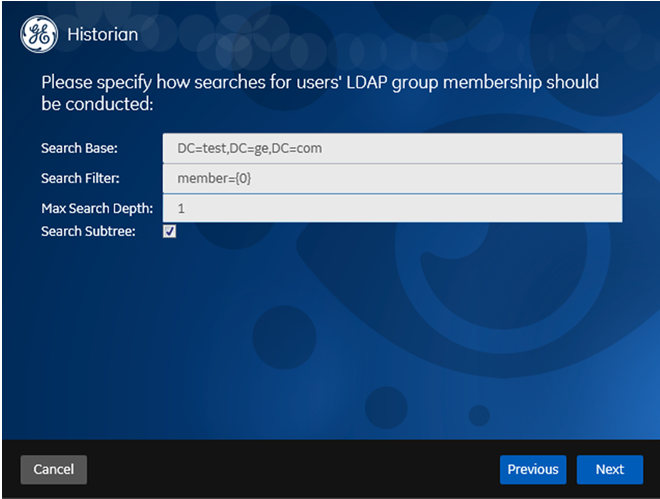
    This screen determines how a LDAP user account's LDAP group membership is determined. In the example shown in the screen, you are finding groups with the member attribute, which contains the user's common name. If Max Search Depth is set to 1, there is no search for nested groups. If Max Search Depth is set to a value greater than 1, then searching in nested groups is enabled.
    Note: Use semicolons to separate DNs. If you leave any of them blank, then you are not associating any LDAP groups to the corresponding scope.
  16. Type the appropriate entries in the Search Base, Search Filter, and Max Search Depth text fields, and make sure the Search Subtree box is checked, and click Next.
    The Ready to Install screen appears.
  17. Click Install.
    The Installing progress bar appears and the installation proceeds. During the install, a Historian screen briefly appears, and then the InstallShield wizard appears. A progress bar appears while the software is prepared for installation and configuration. The installation process may take some time.
    Note: If you are upgrading from either Historian 6.0 Enterprise or previous releases of Historian 7.2 including any of the service packs, this installation option will remove both Client Manager and Configuration Manager. This will have no impact on your data or use of Historian unless you intend to run a mirrored system. You will be prompted by the system and asked if you want to continue with the install. Choosing Yes will remove Client Manager and Configuration Manager and install a single server architecture. Choosing No will terminate the installation program.

    The Installing Proficy Common Licensing screen appears. A progress bar appears while the license is installed. This may take several minutes.

    The Historian Installing screen with the progress meter reappears. The Historian Trend Client and Historian Web Admin icons appear on the desktop, as well as the Historian SDK Help and Historian Help icons.

  18. Click Exit when the Installation Successful screen appears.
    The Reboot Required dialog appears.
  19. Click Yes to restart your computer.
    This may take several minutes.