How Do I...
How Do I...
The following sections describe tasks that you can perform using the application:
Search for Tags
Generally, the first thing any user will want to do is find a tag and put it in a trend chart.
Displaying All Tags
- Click on
 without entering any keywords in the search field.Your Historian tag names appear in alphanumeric order. If there are more tags available than can be displayed on one page, pagination options show at the bottom of the display.
Displaying Specific Tags
Selecting Tags for Use in Displays
Work With Tags
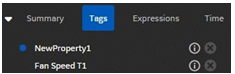
Clicking the Tag tab provides a list of the active tags, or tags you have dragged into a display, Clicking on the Information icon to the right of any tag provides information about an active tag.
Displaying Details for Specific Tags
- Click on the Information icon to the right of the tag.A blue circle appears to the left of the Tag name if you have used the tag in a display. In the following example, the NewProperty1 tag is used in an analysis element so it has a blue dot in front of it.
This information includes the Name, Tag, Source, and UoM as follows:
- Name: Historian tag name
- Description: Historian tag description
- Source: Source Address from the Collector
- UoM: EGU Description from Historian
Create a Display
For more information on building a chart, refer to Build a Trend Chart.
Adding a New Trend Chart
Adding a Value Card
Adding Text
Adding a Current Value Table
Removing an Item
Creating or Modifying the Title
Build a Trend Chart
Creating a New Trend Chart
Changing a Trend Chart Title
Displaying the Y Axis on the Alternative Side of a Trend Chart
Changing the X Axis on a Trend Chart
Changing Trend Chart Tag Format
Applying a Quick Time to a Trend Chart
Inserting a Chart Below an Existing Object
Viewing Statistics for a Trend Chart
- From an opened trend chart, click the Statistics arrow in the bottom left corner of the chart.
Information for that chart displays.
Changing the Sampling Mode for Trend Charts
Configure Time
Configuring the Start and End Time
- Place your cursor in the first Start date cell to view a calendar from which you can select the start date.The current month's calendar appears.
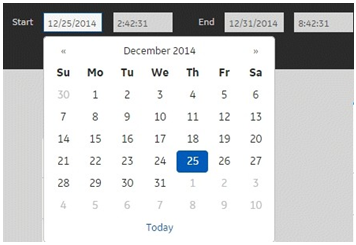
You can use the << or >> arrows (at the top of the calendar) to move to another month.
- Place the cursor in the Start time cell.The Time Selector appears.
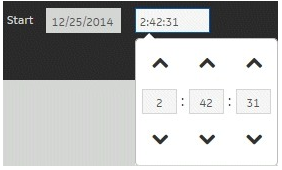
You can use the up and down arrows to select the Start time.
Configuring the Time Zone
Choose a Mode
- Calculation options are not selectable until the Calculated Sampling Mode is chosen.
- If you enter a number in the sample increment by a size that is greater than the default set by your System Administrator, an error message appears that says Error Warning <number> samples - No data will be returned. If you get this error message, you can clear it by clicking the X in the top right corner of the message and re-enter a number equal to or less than the default as displayed in the message.
- You must apply a query for it to persist. For example, if you have multiple charts open and you create a query but do not apply it to that chart, and then switch to another chart, and then return to the chart for which you created the query, your query will be cleared.
Changing a Mode
- From the Sample Increment drop-down menu, select the increment you want to use in this mode.
- If you select By Time, you must enter the time value and define the unit of time you want to use in this mode.

- If you select By Size, you must enter the number of samples. The maximum number is defined by your System Administrator.

- If you select By Time, you must enter the time value and define the unit of time you want to use in this mode.
Work With Favorites
You can view, add, delete, load, export, and import Favorites as follows.
Adding a Favorite
Deleting a Favorite
Restoring a Favorite
Updating a Favorite
- Select Clear Analysis and Reset Editors.
- Click once on the Favorite you want to update.
- Make the appropriate changes to the Favorite.
- Click Save to save the updated Favorite.
Exporting All Favorites
- Click on Export Favorites.
Your JSON file will be saved in your Downloads folder.
Note: The maximum number of supported Favorites is 100.
Exporting a Single Favorite
- Open the Action menu for a single favorite and click on Export.
Your JSON file will be saved in your Downloads folder.
Importing Favorites
Export Data to a Spreadsheet
- You cannot export data for time periods exceeding 30 days (43200 minutes) or 100,000 points, whichever limit is reached first. If any element in your display exceeds either limit, you will see a dialog box indicating the export limit has been exceeded.
- If the export fails, a box displays Failed to export, please check error log for more details. You can check the log file, fix the issues causing the failure, and then try to export again.
- Historian Trend Client provides a configuration in the System Config screen to set a specific delimiter to be used during exporting of data. Only characters that are not reserved characters for XML can be used. The application will not load or it will crash if reserved characters like (<, >, &, etc.) are set as the delimiter.
- To view the CSV files in the proper format, Microsoft Excel 2007 or Excel 2010 is required.
- Raw data is exported and limited to 30 days or 100,000 points, whichever limit is reached first.
- The number of tags per query is determined by the entry in the Query settings.
Exporting Raw Data to a Microsoft Excel File
Exporting Trended Data to a Microsoft Excel File
Work With Filters
Clicking Filter (at the top of the screen) allows you to specify conditions by which to filter data from Proficy Historian for display in your session.
Specifying a Filtering Condition
- Click the Add Condition link on the right side of the screen.Three cells appear for you to enter condition criteria:

- The first cell contains a list of tags used for your analysis session. To select a tag, place the cursor in the cell and select a tag from the drop-down menu.
- The second cell contains available operations. To select an operation, place the cursor in the cell and select a tag from the drop-down menu.
- The third cell allows you to enter a value for the tag you selected to filter.
Perform Administration Tasks
The System Configuration screen allows you to set both overall system preferences and Historian Trend Client preferences.