Working with the Historian Excel Add-In
Configuring the Excel Add-In Options
Excel Add-In Options
| Field | Description |
|---|---|
| Internal vs. External References | Choosing Use External References allows your application to reference cells in other worksheets and workbooks in addition to the current one. If you choose Use Internal References instead, you can only access cells in the current worksheet. The default setting is Use External References. |
| Automatically Update Links to Add- In (Yes/No) | Add-In functions are maintained as worksheet links. If users who share worksheets do not have Microsoft Office installed the same way, it is necessary to turn this feature on. When on, this feature automatically re-establishes any formula links that may be broken due to differences among users in Microsoft Office installation. The default setting enables this feature. The Auto Update feature allows sharing of worksheets. You must, however, install the Excel Add-In in the exact same Microsoft Office Library Path as the other worksheets if you want to use the sharing feature. When opening a worksheet with links to another worksheet, you may receive a message prompting you to update all linked information in the workbook (Yes) or keep the existing information (No). It is recommended that you select No and keep the existing information. The links will be automatically updated for your worksheet. Save your worksheet after the links have been updated. |
| Show/Hide Header Labels | This option lets you display or suppress the column header labels that are automatically placed in the worksheet when entering formulas throughout the Historian dialogs. The default setting is Show Labels. |
| Color | Allows you to select the header name color from the drop-down list: black, blue, red, green, magenta, cyan, or yellow. |
| Assign Default Server | This dialog box shows the current server assignment. You can modify the setting by clicking the Edit button and accessing the Historian Server Managers dialog box. This dialog box allows you to save user connection information, add or connect to a new server, delete a server, and modify the default server. |
| Adjust Column Widths | This option lets you automatically adjust the width of columns in your worksheet as formulas are inserted by Historian dialogs. Click Adjust Header Column Width to modify the width of header labels; click Adjust Data Column Width to modify the data column widths to accommodate the data values. Enabling these options usually makes the worksheet much more readable. However, doing so can sometimes make the worksheet calculate too much when building a large report. In such cases, disable the automatic feature and adjust individual columns manually. |
| Save/Default/Cancel | These action buttons let you apply your choices of options. Click Save to apply the settings you entered, click Default to select default settings for all options, and click Cancel to close the dialog box. |
Searching Tags
The Search Tags command lets you scan the tags on a specified server and then to perform actions on one or more tags you select from that group. When you select the Search Tags command in the Historian menu, the Historian Tag Search dialog box appears.
Searching a Tag Using Advance Search Criteria
The Advanced Tag Search dialog allows you to search the set of tags that match the search criteria and then to perform actions based on one or more tags that you select from the list. It saves the most recently used search criteria to a file named DefaultSearchCriteria.xml in the Excel AppData path (c:\user- s\<username>\AppData) and this criteria is automatically loaded into the dialog the next time it is opened. This feature allows you to re-use or modify the criteria rather than entering them each time. If you want to reset your criteria, delete the XML file.
- Add multiple search criteria based on the tag criteria and the criteria value.
- Modify the existing criteria value.
- Delete the unwanted search criteria from the list.
- Save any list of criteria to a file.
- Load a saved criteria list for searches.
- Automatically load the most recently used criteria for re-use.
- Search the Historian database based on the search criteria.
- View the details of a tag.
Relative Time Entries
When entering the Start and End times for Excel Add-in queries and exports, you can already enter them as exact literal dates and times such as 1/28/14 09:00:00 in the query dialogs like Query Calculated Data, or you can use a cell reference to an exact time, or use an Excel function such as =Now() or =Today(). Apart from the mentioned ways, you can use relative time entries using a base value and an offset value as described in the following tables.
For example, you can use Yesterday+8H for 8am yesterday or Now-15m for 15 minutes before the current time. The typical use of a relative time entry, is to type the time values using a base and an offset into the start and end time of the Query dialogs or Export dialog, instead of having to put =Now() or =Today() in a cell and making a cell reference to that, or use the base Monday to produce weekly reports.
Base Values
| Base Value | Description |
|---|---|
Now |
The current date and time. |
Today |
The current date at midnight. |
Yesterday |
The previous day at midnight. |
Sunday |
Today or the most recent Sunday at midnight. |
Monday |
Today or the most recent Monday at midnight. |
Tuesday |
Today or the most recent Tuesday at midnight. |
Wednesday |
Today or the most recent Wednesday at midnight. |
Thursday |
Today or the most recent Thursday at midnight. |
Friday |
Today or the most recent Friday at midnight. |
Saturday |
Today or the most recent Saturday at midnight. |
Offset Values
| Offset Value | Description |
|---|---|
d |
One 24 hour day |
h |
One hour |
m |
One minute |
s |
One second |
About Querying Alarm and Event Data
For more information on working with alarm and event data in the Excel Add-In, refer to Historian Alarms and Events.
Querying Current Values
Querying Raw Data
Raw data values are the values actually stored in the archive, after applying collector and archive compression, but before applying any interpolation, smoothing, or other signal processing calculations. Querying raw data retrieves these values for a selected tag.
The raw data query returns a number of data points based on the number of rows or columns specified in the output range. If you are not viewing all your data points, select enough rows or columns to display all the data.
Querying Filtered Data
The Query Filtered Data function is similar to the calculated data query, with the addition of a search filter on the data. The search filter allows you to filter the actual data retrieved with a filter condition. This function is useful when trying to retrieve all data for a specific Batch ID, Lot Number, or Product Code and for filtering data where certain limits were exceeded, such as all data where this temperature exceeded a certain value.
When querying filtered data, you can use a Filter Expression instead of FilterTag, FilterMode, and FilterValue parameters. You can use multiple filter conditions in the filter expression. For more information and examples on filter expression, refer to Advanced Topics.
Filter Parameters for Data Queries
| Parameters | Description |
|---|---|
Filter Tag |
The single tag name used when applying the filter criteria. Note: You can enter your filter conditions using Filter tag, Filter Comparison Mode, and Filter Comparison Value or you can put that all that information in a single Filter Expression.
|
Filter Expression |
An expression which includes one or more filter conditions. The type of conditions used are:
FilterExpression can be used instead of FilterTag, FilterComparisonMode and FilterValue parameters. There is no maximum length for a filter expression. |
Filter Mode
|
The type of time filter:
The Filter Mode defines how time periods before and after transitions in the filter condition should be handled. For example, AfterTime indicates that the filter condition should be True starting at the timestamp of the archive value that triggered the True condition and leading up to the timestamp of the archive value that triggered the False condition. |
Filter Comparison Mode |
The type of comparison to be made on the filter comparison value:
The Filter Comparison Mode defines how archive values for the Filter Tag should be compared to the Filter Value to establish the state of the filter condition. If a Filter Tag and Filter Comparison Value are supplied, time periods are filtered from the results where the filter condition is False.
Note: Filter Comparison Mode is only used if Filter Tag is filled in.
|
FilterComparison Value |
The value to compare the filter tag with when applying the appropriate filter to the data record set query (to determine the appropriate filter times). Note: Filter Comparison Value is only used if Filter Tag is filled in.
|
Batch IDs
If you had a BatchID going into a Historian tag, that BatchID will either have a timestamp at the beginning of the batch or at the end of the batch. Different batch systems report the BatchID as the batch is started, and other systems do not report the BatchID until the batch is finished.
If your BatchID is reported at the beginning of a batch, you would need to use the AfterTime option because you would want to include all data for a particular BatchID after the time the BatchID was reported up until the next BatchID was reported. If your BatchID was being reported at the end of the batch, you would want to use the BeforeTime option because you would want to include all data for a particular Batch ID before the time the Batch ID was reported back to the previous BatchID being reported.
Querying Calculated Data
Sampling Types
- Interpolated Sampling
- Calculates values between two data points using a linear inter- polation algorithm.
- Calculated Sampling
- Computes values using an algorithm selected in the Calculation field.
- Lab Sampling
- Computes intermediate values between two data points by using the last actual value. This type of sampling displays as a stair step type of curve.
- Trend Sampling
- Returns the raw minimum and raw maximum value for each specified interval. Use the Trend sampling mode to maximize performance when retrieving data points for plotting. For the Trend sampling mode, if the sampling period does not evenly divide by the interval length, Historian 7.1 ignores any leftover values at the end, rather than putting them into a smaller interval.
- InterpolatedtoRaw Sampling
- Provides raw data in place of interpolated data when the number of samples fall lesser than the available samples.
- TrendtoRaw Sampling
- The TrendtoRaw sampling mode almost always produces the same results as the Trend sampling mode. The exception is that, when more samples are requested than there are raw data points, the TrendtoRaw sampling mode returns all of the available raw data points with no further processing. TrendtoRaw is therefore used rather than Trend when the number of actual data samples are fewer than the requested number of samples.
- LabtoRaw Sampling
- Provides raw data for the selected calculated data over the plot, when the number of samples fall lesser than the available samples.
- RawByFilterToggle Sampling
- Returns filtered time ranges with values 0 and 1. If the value is 1, then the filter condition is true and 0 means false. This sampling mode is used with the time range and filter tag conditions. The result starts with a starting time stamp and ends with an ending timestamp.
- Trend2 Sampling
- Returns the raw minimum and raw maximum value for each specified interval. Use the Trend2 sampling mode to maximize performance when retrieving data points for plotting. Also, if the sampling period does not evenly divide by the interval length, Historian creates as many intervals of the interval length as will fit into the sampling period, and then creates a remainder interval from whatever time is left. Trend2 sampling mode is more suitable than Trend sampling mode for analysis of mins and maxes and for plotting programs that can handle unevenly spaced data.
- TrendtoRaw2 Sampling
- The TrendtoRaw2 sampling mode almost always produces the same results as the Trend2 sampling mode. The exception is that, when more samples are requested than there are raw data points, the TrendtoRaw2 sampling mode returns all of the available raw data points with no further processing. TrendtoRaw2 is therefore used rather than Trend2 when the number of actual data samples are fewer than the requested number of samples.
Calculation Algorithm Types
- Average
- A time weighted arithmetic mean.
- Minimum
- The lowest value in the group.
- Maximum
- The highest value in the group.
- Standard Deviation
- The square root of the arithmetic mean of deviations from the time- weighted arithmetic mean of all values in the group.
- Total
- The time-weighted total of all values in the group. Note that Engineering Units are assumed to be in Units/Day. If your Engineering Units were not measured in Units/Day, you must scale your total to the actual time units of the measurement. For example, if the measurement were in Units/Minute (such as GPM), you would multiply the total number by 1440 (minutes in a day) to scale the value into the correct time units.
- Count
- The total number of values in the group.
- Raw Average
- The unweighted arithmetic mean of all values in the group.
- Raw Standard Deviation
- The square root of the arithmetic mean of deviations from the unweighted arithmetic mean of all values in the group.
- Raw Total
- The unweighted total of all values in the group.
- Time of Minimum Value
- The time at which the minimum value occurred. l Time of Maximum Value - the time at which the maximum value occurred.
- Time Good
- The amount of time (in milliseconds) during the interval when the data quality is good.
- State Count
- Displays the number of times a tag has transitioned to another state from a previous state. A state transition is counted when the previous good sample is not equal to the state value and the next good sample is equal to state value.
- State Time
- Displays the duration that a tag was in a given state within an interval.
- First Raw Value
- Returns the first good raw sample value in the given time interval.
- First Raw Time
- Returns the time stamp of the first good raw sample in the given time interval.
- Last Raw Value
- Returns the last good raw sample value in the given time interval.
- Last Raw Time
- Returns the time stamp of the last good raw sample in the given time interval.
- TagStats
- Returns the values of multiple calculation modes in a single query.
Editing a Query
The Edit Query feature allows you to change query parameters such as tag name, start time, end time, and so on, in Excel. The Edit Query dialog box that displays is based on the type of query you are editing. For example, if you want to edit a calculated query data then the Calculated Edit Query dialog box appears.
You can use the Edit Query feature to request more data than is currently displayed or you can select an output range that does not overlap the current range. However, you cannot make the output range smaller. For example, a query edit that changes the NumberOfSamples or the Output Orientation to values that result in fewer rows or columns will not work.
- From the Add-in drop-down list, select the Edit Query from the Add-In drop down list or click the
 icon or double click any cell which has the query formula. The Edit Query dialog box appears with the existing query data.
Query Modifiers
Query modifiers are used for retrieving data that has been stored in the archive. They are used along with sampling and calculation modes to get a specific set of data.
When using query modifiers, specify #Query Modifier as the Query Criteria String. For example, if the query criteria string is to retrieve only good data quality values, then you should specify #ONLYGOOD as the Query Criteria String.
| Query Modifier | Results |
|---|---|
ONLYGOOD |
The ONLYGOOD modifier excludes bad and uncertain data quality values from retrieval and calculations. Use this modifier with any sampling or calculation mode but it is most useful with Raw and Current Value queries.All the calculation modes such as minimum or average exclude bad values by default, so this modifier is not required with those. |
INCLUDEREPLACED |
Normally,when you query raw data from Historian, any values that have been replaced with a different value for the same timestamp are not returned. The This modifier is only useful with rawbytime or rawbynumber retrieval. Do not use it with any other sampling or calculation mode. |
INCLUDEDELETED |
The INCLUDEDELETED modifier retrieves the value that was previously deleted. Data that has been deleted from the archiver is never actually removed but is marked as hidden. Use the INCLUDEDELETED modifier to retrieve the values that were deleted, in addition to any non-deleted values during the query time period.This modifier is only useful with |
ONLYIFCONNECTED/ONLYIFUPTODATE |
The ONLYIFCONNECTED and ONLYIFUPTODATE modifiers can be used on any sampling or calculation mode to retrieve bad data if the collector is not currently connected and sending data to the archiver.The bad data is not stored in the IHA file but is only returned in the query. If the collector reconnects and flushes data and you run the query again, the actual stored data is returned in the following situations:
|
ONLYRAW |
The ONLYRAW modifier retrieves only the raw stored samples. It does not add interpolated or lab sampled values at the beginning of each interval during calculated retrieval such as average or minimum or maximum.Normally, a data query for minimum value will interpolate a value at the start of each interval and use that together with any raw samples to determine the minimum value in the interval. Interpolation is necessary because some intervals may not have any raw samples stored. Use this query modifier with calculation modes only, not with raw or sampled retrieval like interpolated modes. |
LABSAMPLING |
The LABSAMPLING modifier affects the calculation modes that interpolate a value at the start of each interval.Instead of using interpolation, lab sampling is used. When querying highly compressed data you may have intervals with no raw samples stored. An average from 2 P.M to 6 P.M on a one hour interval will interpolate a value at 2 P.M., 3 P.M., 4 P.M, and 5 P.M and use those in addition to any stored samples to compute averages. When you specify |
ENUMNATIVEVALUE
|
The ENUMNATIVEVALUE modifier retrieves the native, numeric values such as 1 or 2 instead of string values such as on/off for the data that has enumerated states associated with it. You can use |
INCLUDEBAD |
Normally,when you query calculated data from Historian, only good data quality raw samples are considered. INCLUDEBAD modifier includes bad data quality values in calculations.You can use |
FILTERINCLUDEBAD |
Typically while filtering we use only good data quality values. When we use FILTERINCLUDEBAD, the bad data quality values are considered when filtering to determine time ranges. This query modifier is not always recommended. |
USEMASTERFIELDTIME |
The USEMASTERFIELDTIME query modifier is used only for the MultiField tags. It returns the value of all the fields at the same timestamp of the master field time, in each interval returned. |
HONORENDTIME |
Normally, a query keeps searching through archives until the desired number of samples has been located, or until it gets to the first or last archive. However, there are cases where you would want to specify a time limit as well. For example, you may want to output the returned data for a In cases where you want to specify a time limit, you can do this by specifying an end time in your |
EXAMINEFEW |
Queries using calculation modes normally loop through every raw sample, between the given start time and end time, to compute the calculated values. When using Using this query modifier is recommended when:
Use this query modifier only with |
Exporting Tags
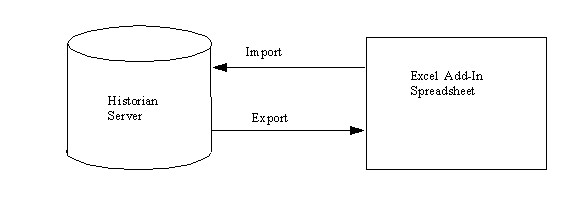
The Export Tags function permits you to send tag information from the Historian Server to an Excel worksheet or to another system, which may be either local or remote.
- Before importing or exporting tags, data, or messages, you should be aware of a convention used with the Historian application. The Server is the reference point for all import and export functions, as illustrated in the following figure. If you want to move tag information from the Server into your worksheet, you must use the Export Tags command. Conversely, if you want to move data from your worksheet to the server, you must use the Import Data command.
- You cannot enter more than 32,767 characters in a single cell in an Excel worksheet.
It is recommended that you first export a tag and then import it, to become familiar with the procedure and what the data looks like.
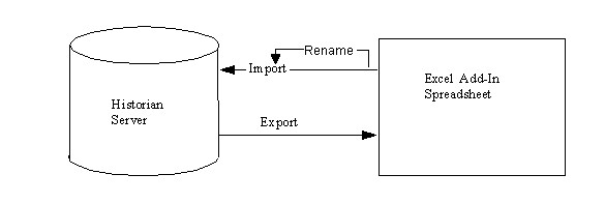
Renaming Tags
It is recommended that you first export a tag, rename the tag, and then import it, to become familiar with the procedure and what the data looks like.
Rename (Alias) Tags
You can rename tags through the Non-Web Historian Administrator, Excel Add-in, ihuAPI, and SDK. New tag names are called active tags and old tag names are called as aliases. Tag renaming will only update or modify tag names without modifying or changing the tag properties.
If you want to modify a renamed tag property, be aware that of all the alias' tag properties will also be updated. Whenever you rename a tag name, then the active tag name (that is, the new tag name) will be visible in the Tags list on the Historian Administrator Tag Maintenance screen. You can rename tags multiple times, but only the latest active tag name will be visible in the Tags list.
Permanently Renaming Tags
Historian allows you to permanently rename tag names using Excel Add-in. You can permanently rename a tag if you no longer want to read and write a tag by its previous name. Permanent rename makes the previous tag name available for new usage.
Importing Tags
The Import Tags function permits you to move tag information into the Historian Server from an Excel Worksheet or from another system, which may be either local or remote.
When used with the Excel Add-In, the Import Tags function moves selected information from your current worksheet into the specified Historian Server. There is no error checking when you import tags through the Excel Add-In.
For example, with the Excel Add-In you can successfully import unsolicited tags without a calculation dependency (trigger). The Historian Administrator prevents you from performing this import. As another example, the Excel Add-In allows you to import circular references, while the Historian Administrator does not.
Deleting Tags
You cannot use the Excel Add-In to delete tags from your Historian system. For more information on deleting tags, see the Using the Administrator > Delete Tags.
Exporting Enumerated Sets
The Export Enumerated Sets function enables you to display information about enumerated sets in an Excel worksheet. Using this function, you can export sets data from Historian, add and edit the enumerated setsinformation, and import it back into Historian.
This feature allows you to make changes in bulk and send them to Historian in a simple procedure without using the Histroian Administrator. Before importing or exporting enumerated sets, you should be aware of a convention used with the Historian application. The Server is the reference point for all import and export functions. If you want to move tag information from the Historian Server into your worksheet, you must use the Export Enumerated Sets command.
Conversely, if you want to move data from your worksheet to the server, you must use the Import Enumerated Sets command. If you plan to import set information, it is recommended that you first export a set, to become familiar with the format.
Importing Enumerated Sets
Renaming Enumerated Sets
The Rename Enumerated Sets function enables you to rename existing enumerated sets in an Excel worksheet. To become familiar with the procedure, it is recommended that you first export an Enumerated Set, rename the Enumerated Set, and then import it.
You can rename enumerated sets through the Non-Web Historian Administrator, the Excel Add-in, ihAPICom, and the SDK. Renaming an enumerated set modifies only the name of the enumerated set without modifying the properties of the enumerated set.
Whenever you rename an enumerated set, the active enumerated set name (that is, the new name for the enumerated set) is visible in the Enumerated Sets list on the Historian Administrator's Enumerated Sets maintenance screen. You can rename enumerated sets multiple times, but only the latest active enumerated set name will be visible in the Enumerated Sets list.
Working with Enumerated Sets Using Excel Add-In
To add sets:
- Enter details in the following columns in the excel worksheet.
It is recommended to fill the columns in the following sequence: SetName, SetDescription, StateName, StateDescription, StateLowValue, StateHighValue, StateRawValueDataType, and NumberOfStatesInThisSet.
- Click the Import Enumerated Sets to import the sets.
To delete sets:
- Select the row that has the state you want to delete.
- Right-click the row and select Delete.
Alternatively, you can also use the Delete key on your keyboard.
To modify the description of a set:
Click in the StateDescription cell and modify the description.
You cannot modify the name of the set. If you change the name of the set, it is considered a new set.
To add states:
- Select the set to which you want to add a set.
- Add the name of the set in the SetName column.
The name should be same as the set you selected.
- Enter the details in the SetDescription, StateName, StateDescription, StateLowValue, StateHighValue, and StateRawValueDataType columns.
- Enter the total number of states in the NumberOfStatesInThisSet column.
Ensure that this value is the same for the current state and existing states in the set. For example, if a state has two states already and you are adding a third state, the number of states for all the three states should be changed to three.
A new state is added to the set.
To modify states:
- Select the state you wish to modify by clicking the row in the Excel worksheet.
- Modify the values by clicking in the respective columns.
The state/states are modified.
To delete states:
- Select the row that has the state you wish to delete.
- Right-click the row and select Delete.
Alternatively, you can also use the Delete key on your keyboard.
Exporting User Defined Types
Importing User Defined Types
The Import User Defined Types function enables you to create or modify User Defined Types in the Historian Server. You can also add and modify User Defined Types using the Historian Administrator.
Working with User Defined Types Using Excel Add-In
To add User Defined Types:
- Enter details into the columns in the excel worksheet. Note: The columns are listed here according to the way they appear in the Excel worksheet. However, it is recommended to fill the columns in the following sequence: UserDefinedTypeName, User- DefinedTypeDescription, FieldName, FieldDescription, FieldDatatype, IsMasterField, NumberOfFields, StoredFieldQualities and AdminSecurityGroup.
- Click Import UserDefinedTypes to import the types.
To modify the description of a User Defined Type:
- Click in the User Defined Type Description cell and modify the description.Note: You cannot modify the name of the type. If you change the name of the type, it is considered as a new type.
- Click the Import User Defined Types to import the types.
To add fields:
- Select the UserDefinedType to which you wish to add a field.
- Add the name of the type in the UserDefinedTypeName column. The name should be same as the type selected by you.
- Enter the details in the UserDefinedTypeDescription, FieldName, FieldDescription, FieldDatatype, IsMasterField, NumberOfFields, StoredFieldQualities and AdminSecurityGroup columns.
- In the NumberOfFields column, enter the total number of fields. Ensure that this value is the same for the current field and existing fields in the user defined type.
For example, if a UserDefinedType has two fields already and you are adding a third field, the number of fields for all the three fields should be changed to three. A new field is added to the UserDefinedType on import.
To modify fields:
- Select the field you wish to modify by clicking the row in the Excel worksheet.
- Modify the values by clicking in the respective columns. The field/fields are modified on import.
To delete fields:
- Select the row that has the field you wish to delete.
- Right-click the row and select Delete. Alternatively, you can also use the Delete key on your key- board.
- Click the Import UserDefinedTypes to update your changes.
Exporting MultiField Source Address
The Export MultiField Source Address function enables you to display information of the source address of the multifield tags in an Excel worksheet.
Importing MultiField Source Address
The Import MultiField Source Address function enables you to import the source address of the individual fields in the Historian Server.
Working with Array Tags Using Excel Add-In
Historian allows you to store a set of values with a single timestamp and then read the elements back individually or as an array tag. In Historian, we can modify a tag to an array tag by specifying the NumberOfElements as -1. Where NumberOfElements indicates the tag is an array tag. If the NumberOfElements is -1, then the tag is an array tag.
Tags with zero NumberOfElements are not array tags. Since the size of the array is dynamic there is no single number of elements that can be returned. In Excel Add-in each element of the array tag is displayed in separate rows with tagname with index (Tag-name[]) and values. You can perform all operations that you use for a tag on an Array tag. You can export, import and query an array tag or an array element.
- Array tags do not support Enumerated set.
-
TagStats Calculation Mode is not supported.
Adding New Tags or Modifying Tag Parameters
This can be a very convenient mechanism when you are working with large numbers of tags. If any conflicting names or parameters occur, the system displays a warning message to alert you to the problem. You can then eliminate the conflict and try again.
You can also modify tag parameters by editing them in the worksheet and then bulk importing them into Historian.
Exporting Data
Importing Data
Searching Messages
The Search Messages function lets you search the archives for selected types of messages generated during a specific time period and to display selected fields from those messages. This puts a dynamic formula in the worksheet. Dynamic formulas allow you to build a dynamic message report that you can build, save, and re-use.
Exporting Messages
The Exporting Messages function lets you find messages and export them from the server to your worksheet or to a CSV or XML file. You can specify the server and select the messages to be exported by specifying a start time, an end time, or a text string, using standard wildcards, where applicable.
You can also select which fields of the messages are exported, such as time stamp, topic, message string, message number, substitutions, or username.
Importing Messages
The Importing Messages command writes all messages from the worksheet into the server. When you initiate the import function, a dialog box asks if you want to import messages from your worksheet into a specified server.
If you reply Yes, it scans your worksheet for messages, writes them to the server, and notifies you that the operation succeeded or failed. If you choose to export messages from Historian 7.1 into Excel and then import the messages back into the Historian 7.1, note that the Importing Messages function only allows you to add messages to the Historian Server. It does not allow you to modify or remove any existing messages.
Listing Archives
The List Archive function returns a list of selected statistics about an archive file. You can specify the server, the archive file name, and the type of information displayed, such as start time, end time, file name, target file size, current file size, current or read-only status, last backup time, and last backup users. You can also specify a range of cells for the display.
Listing Collectors
The List Collectors function returns a list of selected statistics about a collector. You can specify the server, the collector name, and select the type of information displayed. You can also specify the range of cells for the display.
Tag Criteria List
The following table outlines the tag criteria available:
| Criteria | Description |
|---|---|
| Tagname | Tagname or tag mask property of the tag. |
| Description | User description of the tag. |
| Data Type | The data type of the tag. |
| Collector Name | Name of the collector responsible for collecting data for the specified tag. |
| Collector Type | The type of collector responsible for collecting data for the tag. Note: Do not use wildcards in this field.
|
| Collection Type | Type of collection used to acquire data for the tag. |
| Data Store Name | Indicates the name of the Data Store to which the tag belongs to. |
| EGU Description | Indicates the engineering units assigned to the tag. Note: Do not use wildcards in this field.
|
| Comment | Comments that is applied to the tag. Note: Do not use wildcards in this field.
|
| Source Address | The address for the selected tag in the data store. Note: Do not use wildcards in this field.
|
| Collection Interval | The time interval between the readings of data. The value entered is in milliseconds. |
| Collector Compression | Whether or not collector compression is enabled as a default setting. |
| Archive Compression | Indicates the current effect of archive data compression. |
| Last Modified User | The name of the person who last modified the tag configuration parameters. |
| Enumerated Set Name | Indicates the enumerated set name associated with the tag. |