To enable writing files between the servers within your APM Connect architecture, file shares need to be mounted. This topic details the basic process for setting up a file share based on your operating systems. Generally, this process involves, creating a file share to be mounted, then mounting the file share, and then making the file share permanent.
IMPORTANT: The process can vary greatly between organizations based on network configurations. Additionally, this procedure should be completed by an administrator with the expertise to manage network configurations.
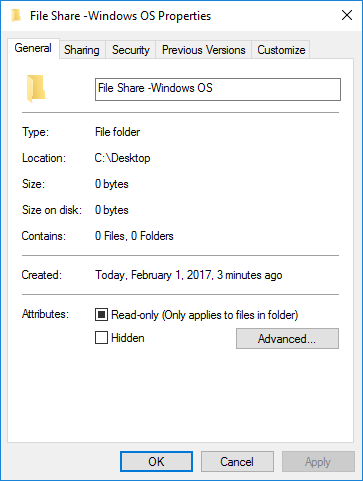
On your APM Connect server (i.e., the Windows server on which you want to create the share), create a new folder for file sharing.
Note: This share can be anywhere on your APM Connect server and can have any name.
Right-click on the new folder, and then select Properties.
The <Folder Name> Properties window appears.
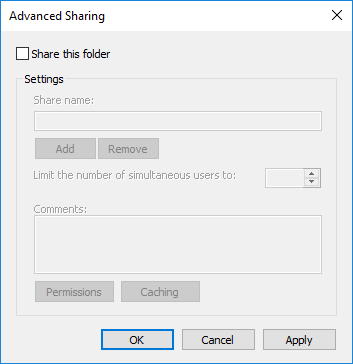
Select the Sharing tab, and then select Advanced Sharing.
The Advanced Sharing window appears.
Select the Share this folder check box.
The other fields on the window are enabled.
Optionally, edit the name in the Share name: box. If you do not edit this name, the name will default to the folder name.
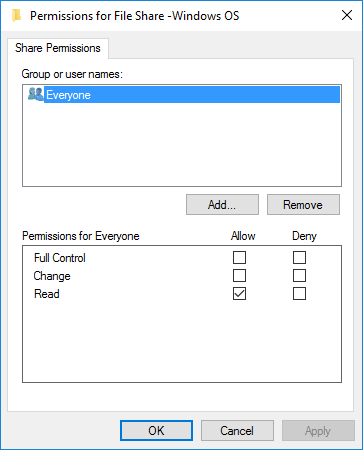
Select Permissions.
The Permissions for <Folder Name> window appears.
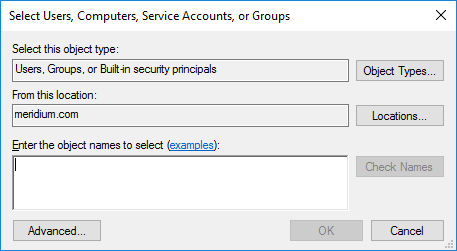
Select Add….
The Select, Users, Computers, Service Accounts, or Groups window appears.
In the Enter the object names to select (examples) box, enter the name of your APM Connect service account user.
Note: The user must have permission to read and write to the shared folder.
Select OK.
The Select, Users, Computers, Service Accounts, or Groups window closes.
On the Permissions for <Folder Name> window, in the Permissions for <Service User Name> box, in the Allow column select the Full Control check box, the Change check box, and the Read check box.
Select OK.
The Permissions for <Folder Name> window closes.
On the Advanced Sharing window, select OK.
The Advanced Sharing window closes. Then, on the <Folder Name> Properties window, in the Network File and Folder Sharing section, the Network Path: subsection is populated.
Record the network path.
Mount the File Share
Access your SAP PI server or your SAP server (i.e., the Linux server to which you want to mount the share) via a Linux Command Line Editor tool (e.g., Vim or Nano).
Determine an existing directory that will be used as the share, or create a new directory.
In that directory, to initiate the connection between your source and target share, execute a mount command. The command will likely require the APM Connect service account user, source of the file share folder you created on the APM Connect server, and target for the share on your Linux server.
Tip: The exact mount command will vary based on the system that you are using. An example of a mount command is mount -t smbfs -o username=Administrator //recurring/c$ /mnt/recurring
To verify that the new mount is configured correctly, enter the command mount.
The mount appears in the list of mounted shares.
Tip: At this point, you should be able to write files from one share to another. To test, place a file in the source folder on the Windows machine, and then the file should appear in the target directory on the Linux machine.
Make the Share Permanent
On the Linux machine, navigate to the file /etc/fstab.
Tip: Mounting the share into the /etc/fstab file makes the file share permanent meaning that upon reboot the file share is still be mounted. If you do not execute the mount in this location, once the machine is rebooted the mount will be disconnected.
Open the file to be edited using a data base editor (e.g. Vim or Nano).
Add a new line to the file defining the share, mount point, file system driver, and options.
Tip: The following is an example of the file syntax: //<Source Folder Name> /<Target Folder Name <Systems Type or Driver> username=username password=<password> 02
.
Additionally, the following is the same entry with sample values: //APMConnectServer1/WindowsSharedFolder /opt/LinuxSharedFolder cifs –o username=APMConnectSeriveAccount1 password=APMConnect 0 2
Close the file, and then return to the root directory.
To unmount the share created, execute the command umount (i.e., if the original mount directory was /opt/LinuxFileShare, then execute the command unmount /opt/LinuxFileShare).
Tip: You must unmount the share from the original location for it to be mounted from the /etc/fstab file.
Execute the command mount.
The original mount directory does not appear in the list of mounted shares, and the new share in the /etc/fstab folder can be mounted.
Execute the command mount –a.
Tip: Executing the command will read the configuration from the /etc/fstab file, and then preform the mount operation based on the parameters in the file.
To verify that the share has been mounted, execute the command mount.
The new mount point added to the /etc/fstab file appears in the list.
At this point, you can place a file on the APM Connect server in the shared folder, and it will be transferred to the shared Linux folder.
Access your SAP Server (i.e., the Linux server to which you want to mount the share) via a Linux Command Line Editor tool (e.g., Vim or Nano).
Ensure that the nfs-kernel-server service is installed and running.
IMPORTANT: The name of this service can vary based on the Linux system.
Create the directory that will be mounted to your SAP PI server or your SAP server.
To grant the remote server permission to mount a local directory, locate the file /etc/exports.
In that file, enter the directory you created in Step 3, and then identify the server that can mount the directory.
For example, if you wanted to create the directory /opt/PI_FileShare and grant all users permissions to mount that directory, then you would enter the following: /opt/PI_FileShare *(rw, sync, no_root_squash, not_subtree_check).
Tip: You can find all of the export options and access control lists in the manual file accessed by executing the command man exports.
Restart the service /etc/init.d/nfs-kernel-server.
Mount the File Share
Access your SAP PI server or your SAP server (i.e., the Linux machine to which you want to mount the share).
Create a directory to which files will be written from the share.
Execute the mount command to mount the exported directory on to the SAP PI server or the SAP server.
Tip: The exact mount command will vary based on the system that you are using. An example of a mount command is mount example.hostname.com:/ubuntu/local/ubuntu
.
For example, if your SAP server hostname is SAPServer1, your source directory is /opt/PI_FileShare, and your target directory is /opt/SAP_FileShare, you would enter the following: mount SAPServer1: /opt/PI_File_Share /opt/SAP_FileShare
The directory created in step 8 appears in the list of mounted directories.
Tip: At this point, you should be able to write files from one share to another. To test, place a file in the source folder on the Windows machine, and then the file should appear in the target directory on the Linux machine
Make the File Share Permanent
On the Linux machine on which the share will be mounted, navigate to the file /etc/fstab.
Tip: Mounting the share into the /etc/fstab file makes the file share permanent, meaning that upon reboot the file share will still be mounted. If you do not execute the mount in this location, once the machine is rebooted the mount will be disconnected.
Open the file to be edited using a database editor (e.g., Vim or Nano).
Add a new line to the file defining the share, mount point, file system driver, and options.
Tip: The following is an example of the file syntax: <exporting server hostname>:<exported Folder Name> <Target Folder Name> <Systems Type or Driver> 0 2
.
Additionally, the following is the same entry with sample values: APMConnectServer1.company.com:/exportedFolder /opt/mountpointFolder nfs 0 2
Close the file, and then return to the root directory.
To unmount the share in the directory created in step 8, execute the command umount.
For example if the original mount directory was /opt/LinuxFileShare, then execute the command unmount /opt/LinuxFileShare.
Tip: You must unmount the share from the original location for it to be mounted from the /etc/fstab file.
Execute the command mount –a.
Tip: Executing the command will read the configuration from the /etc/fstab file, and then preform the mount operation based on the parameters in the file.
To verify that the share has been mounted, execute the command mount.
The new mount point added to the /etc/fstab file appears in the list.
At this point, you can place a file on the APM Connect server in the shared folder, and it will be transferred to the shared Linux folder.